Building a Preset
On this page
A preset brings together your physical pedal routing, virtual effects, mixer levels, MIDI messages and CTRL output states. Start with My Pedalboard configured to match your wiring so that each physical pedal appears with the correct name and colour.
Creation order: choose a template → select inputs and bus mode → arrange physical pedals → place and edit virtual blocks → check outputs and levels → set any CTRL or buffer options → name, save and test the preset.
Preset Editor overview
The main Preset Editor shows the signal route from the input selectors on the left to the outputs on the right. Bus A is the yellow path; Bus B, when enabled, is the blue path. Physical pedal cards occupy positions along those paths, and the orange chip symbols mark the available virtual-block positions.
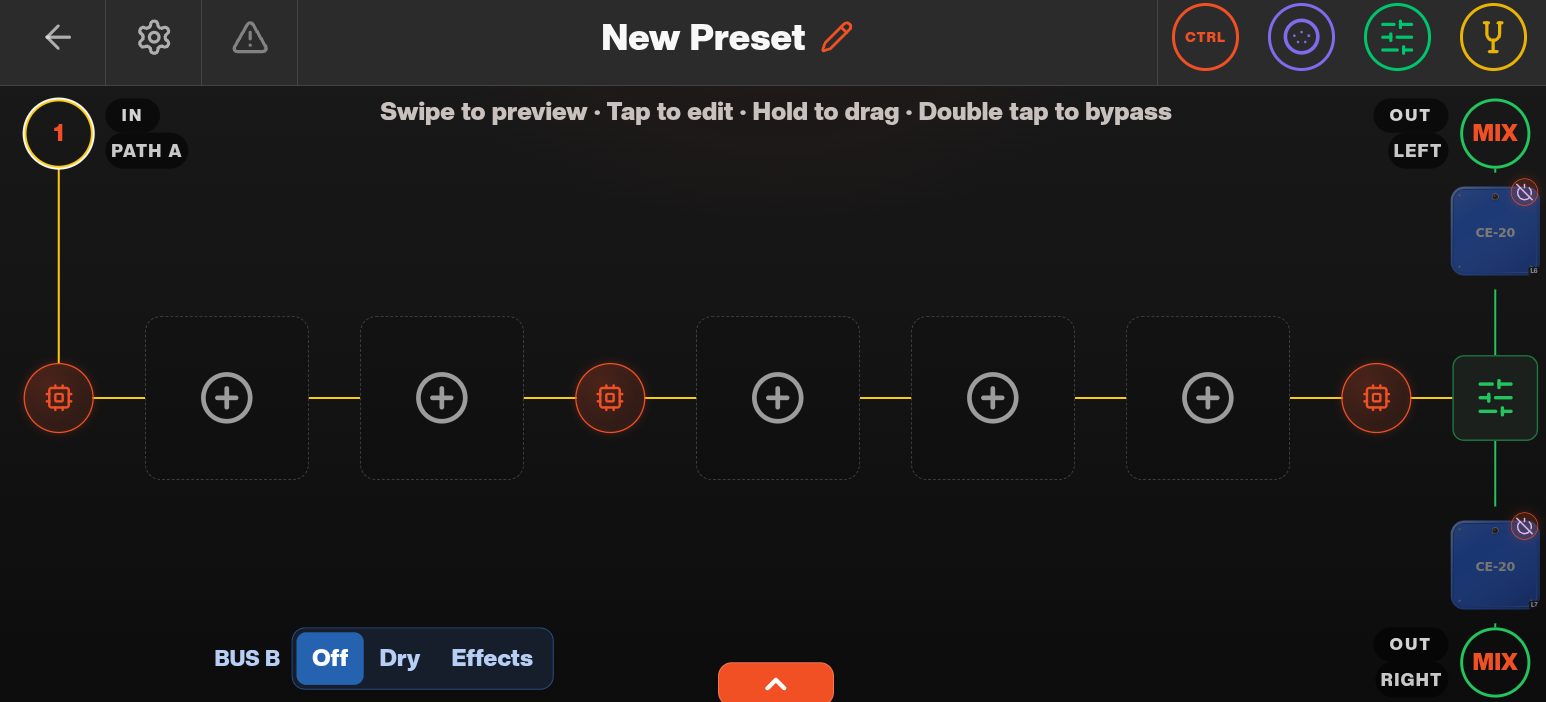
| Part of the editor | Purpose |
|---|---|
| Input circles marked 1 or 2 | Select the rear-panel input feeding each path. Tap to cycle the choice. Input 1 is IN1 and input 2 is IN2. |
| Physical pedal cards | Represent connected pedals. Their position determines the order in which the signal reaches them. |
| Virtual 1 and Virtual 2 | Digital processing blocks placed at Pre, Mid or Post on either bus. Each opens into its own effect chain. |
| BUS B: Off / Dry / Effects | Choose whether the second path is unused, carries a dry signal, or contains effects. |
| Output circles beside OUT LEFT and OUT RIGHT | Tap to cycle the output routing. Examples below show separate L/R routes and MIX. |
| Green mixer controls | Adjust bus and virtual-loop levels. |
| CTRL | Set the two relay control outputs for the preset. |
| Warning-triangle icon | Toggle the input buffers. |
| Orange drawer handle at the bottom | Open or close the library. |
| Pencil beside the preset name | Rename the preset. |
The on-screen gesture guide reads Swipe to preview · Tap to edit · Hold to drag · Double tap to bypass. Hold a card to move it, and double-tap a pedal or virtual block to change its bypass state. Tap a virtual block to edit the effects inside it; swipe across it to preview its pedals, amp and cab from the main routing page.
Your first preset
This walkthrough builds OC-2 → Tube Screamer → a virtual delay/reverb chain on Bus A. It uses the physical wiring from My Pedalboard: OC-2 in L1 and TS9 in L2. Connect your instrument to IN1 and use OUT L for the listening setup. Leave Bus B off while building this first route.
The later screenshots show additional options, including Bus B, amp models and the stereo CE-20. Add these once the basic route is working.
1. Create a preset and choose a template
From a song's empty slot, tap Add Preset → Create New Preset. To work on an existing sound, select it on the Jam Page and tap Edit Preset.
| Template | Starting point |
|---|---|
| Full | Physical pedal routing and virtual effects together. Use this for the walkthrough. |
| Virtual Only | A virtual rig built from effects, an amp and a cab. |
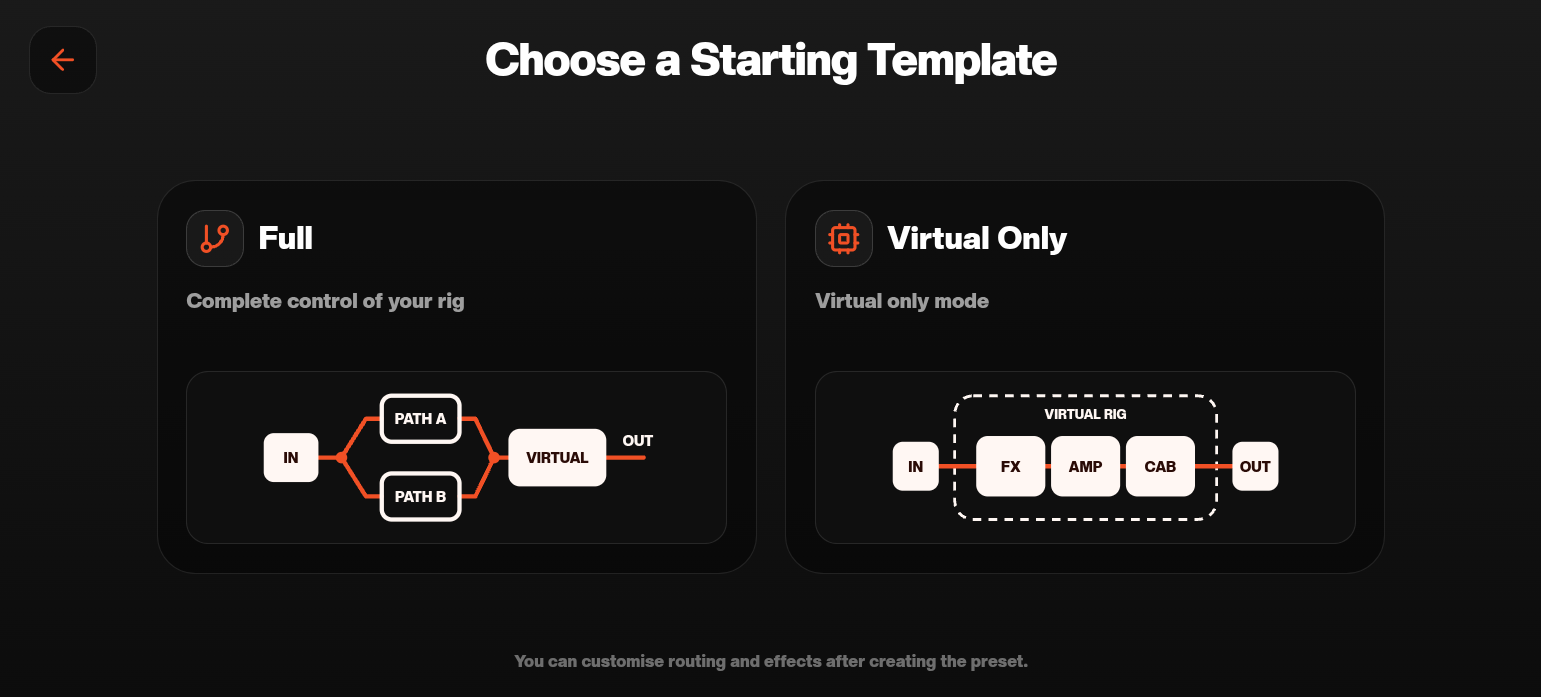 Choose a Starting Template screen with Full and Virtual Only options
Choose Full, check that Path A's input circle reads 1, and set BUS B to Off. Check the output selection before listening; the example starts with MIX at both output selectors.
2. Add and arrange physical pedals
Open the library drawer using the orange handle at the bottom. The Physical view shows the pedals configured in My Pedalboard, along with Virtual 1 and Virtual 2. Use My Pedalboard in the drawer if the physical pedal names or connections need correcting.
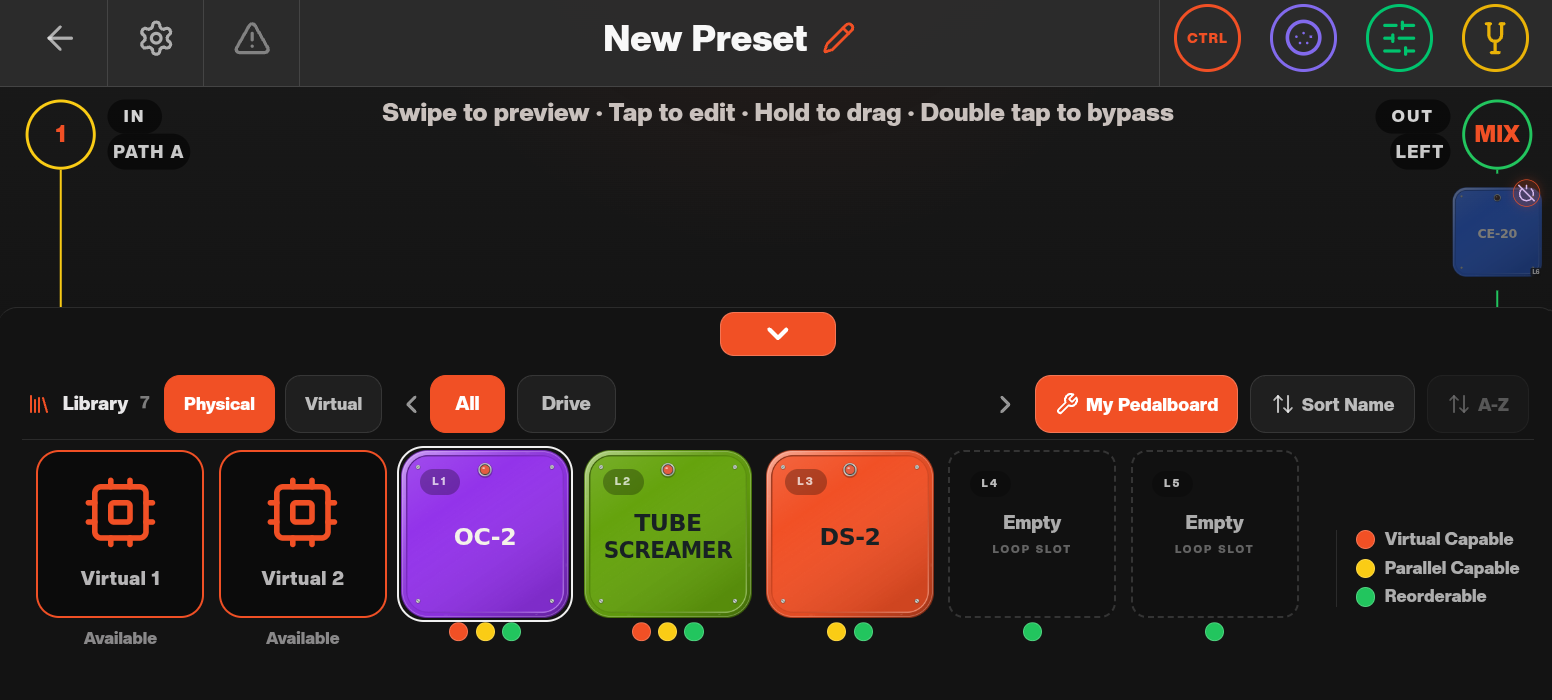 Preset Editor library drawer showing Virtual 1, Virtual 2 and the physical pedals assigned to L1–L5
- Drag OC-2 into the first position on Bus A.
- Drag TUBE SCREAMER into the second position.
- Close the drawer to inspect the route, then play through the pedals.
- Double-tap each pedal card to compare its enabled and bypassed sound.
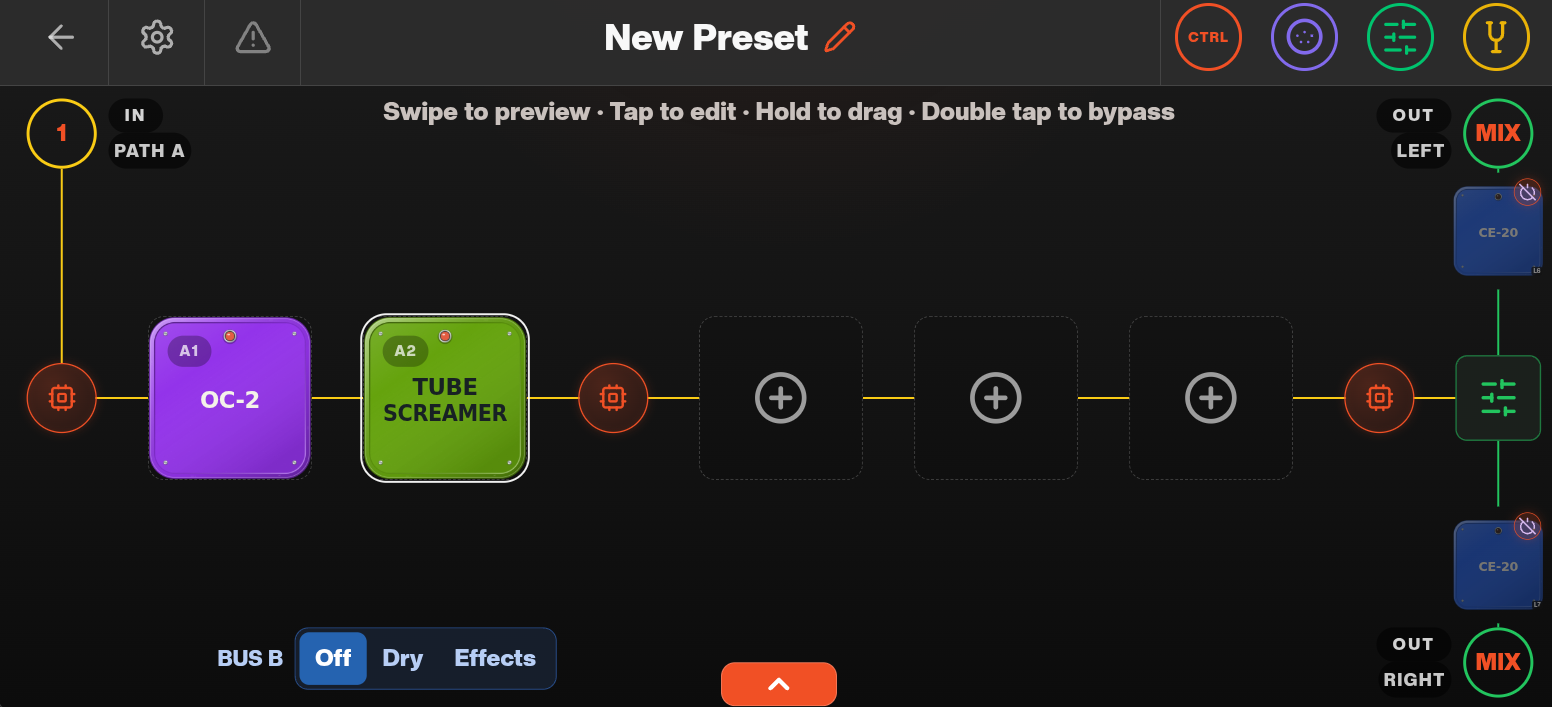 OC-2 and Tube Screamer placed in positions A1 and A2 on Bus A
A1, A2 and similar labels are positions in the preset's signal chain, not rear-panel loop numbers. A pedal remains connected to its original physical loop when you move its card. Hold and drag a card to change its place in the chain.
L1–L3 can move between Bus A and Bus B when Bus B is in Effects mode. L4–L5 remain on Bus A. A physical loop is shared between the buses, so place it on the path where it is needed. The alternative below puts DS-2 on Bus A, with Tube Screamer followed by OC-2 on Bus B.
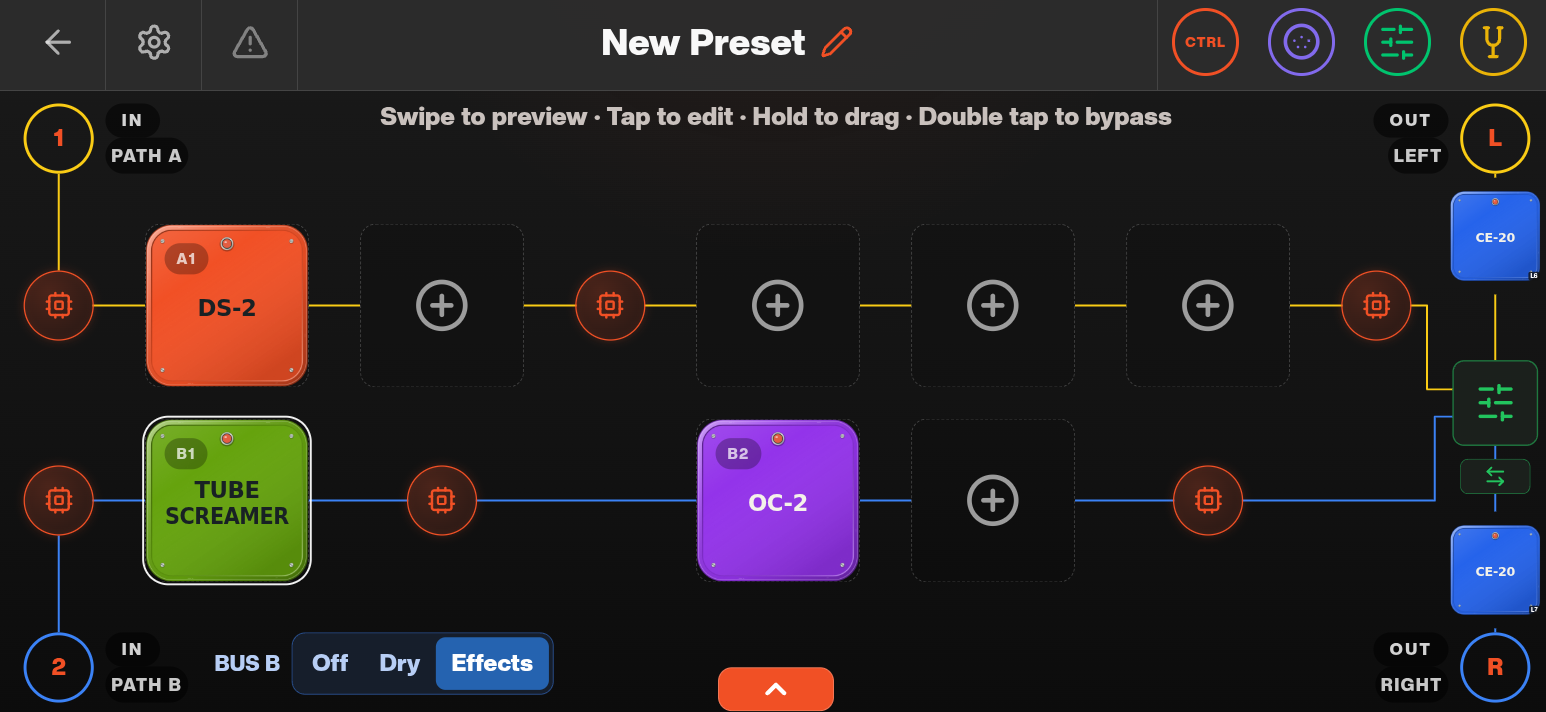 Alternative routing with DS-2 on Bus A and Tube Screamer followed by OC-2 on Bus B
3. Place a virtual block
A virtual block is a digital processing chain inserted into an analogue bus. It is separate from the individual digital pedals, amp and cab inside it. The two blocks appear as Virtual 1 and Virtual 2 in the library and Virtual Loop 1 or Virtual Loop 2 when editing their contents.
Drag a virtual block from the main library onto an orange chip position. For this walkthrough, place Virtual 1 at Mid on Bus A, after OC-2 and Tube Screamer.
| Position | Bus A | Bus B |
|---|---|---|
| Pre | Before physical slot 1 | Before physical slot 1 |
| Mid | After slot 2 | After slot 1 |
| Post | After slot 5 | After slot 3 |
Positions refer to slots in the reordered chain. Empty or bypassed positions do not move the Mid or Post insertion point. Both Post positions are before the final stereo loop. See Virtual block positions for the routing reference.
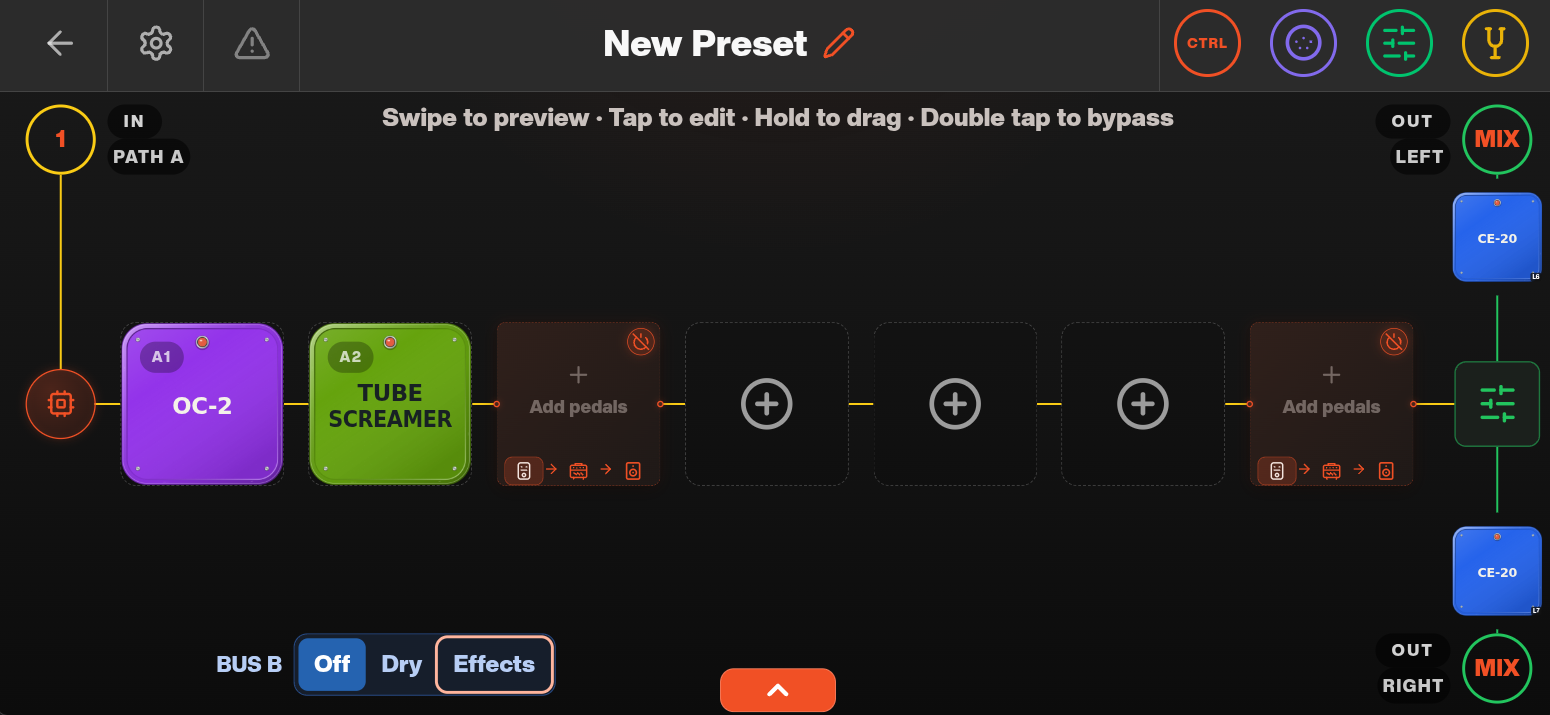 Virtual blocks placed at Mid and Post on Bus A, with the Pre chip position still available
You can place the second block on the same bus or on Bus B. The next example shows a virtual block at Mid on each bus, with DS-2 before the block on Bus B.
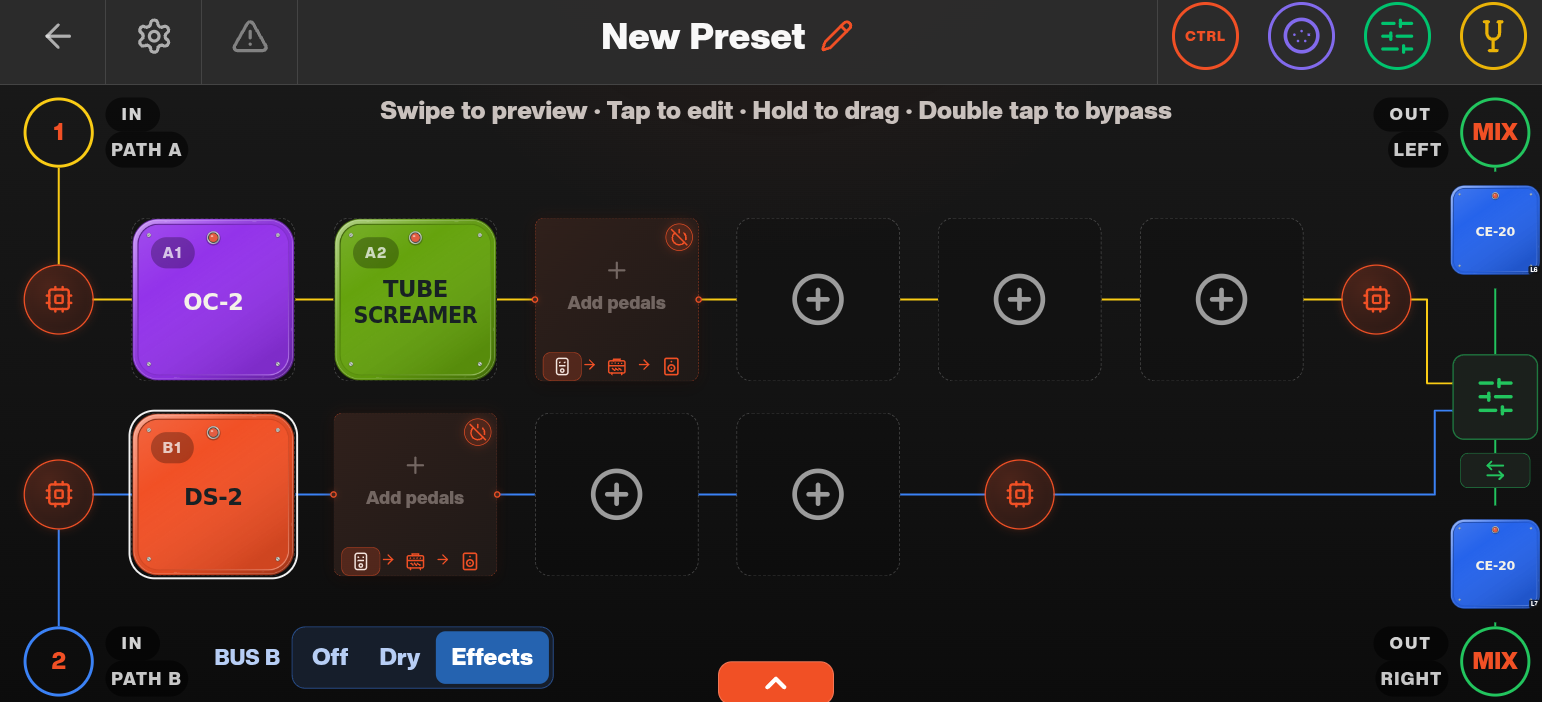 Virtual blocks at Mid on Bus A and Bus B
4. Add effects inside the virtual block
Tap the placed virtual block to open its editor. The screen has five pedal positions followed by Add amp and Add cab. Labels such as V2-1 mean pedal position 1 inside Virtual Loop 2; they are not physical loop connections.
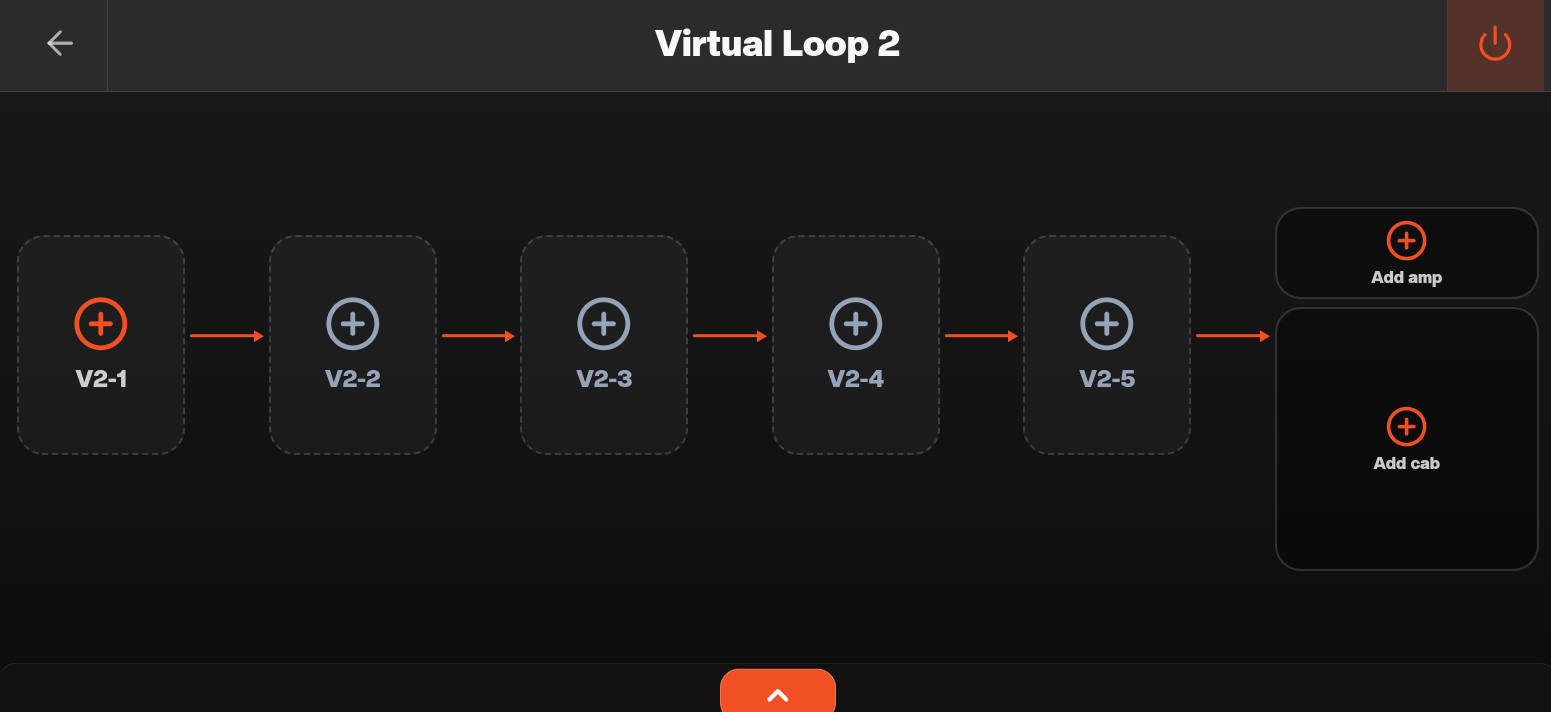 Empty Virtual Loop 2 with five pedal positions followed by Add amp and Add cab
- Tap an empty pedal position or open the bottom drawer.
- Choose Pedals, then a category such as Delay or Reverb.
- Add an effect to the selected position. For the walkthrough, add Echo followed by Freeverb.
- Tap an effect to open its controls and adjust it while playing. Use its bypass control to compare the sound with and without processing.
- Hold and drag effect cards when you want to change their order.
Check that the virtual block is enabled before listening. Use the power control at the top right of the virtual editor to change the whole block's bypass state.
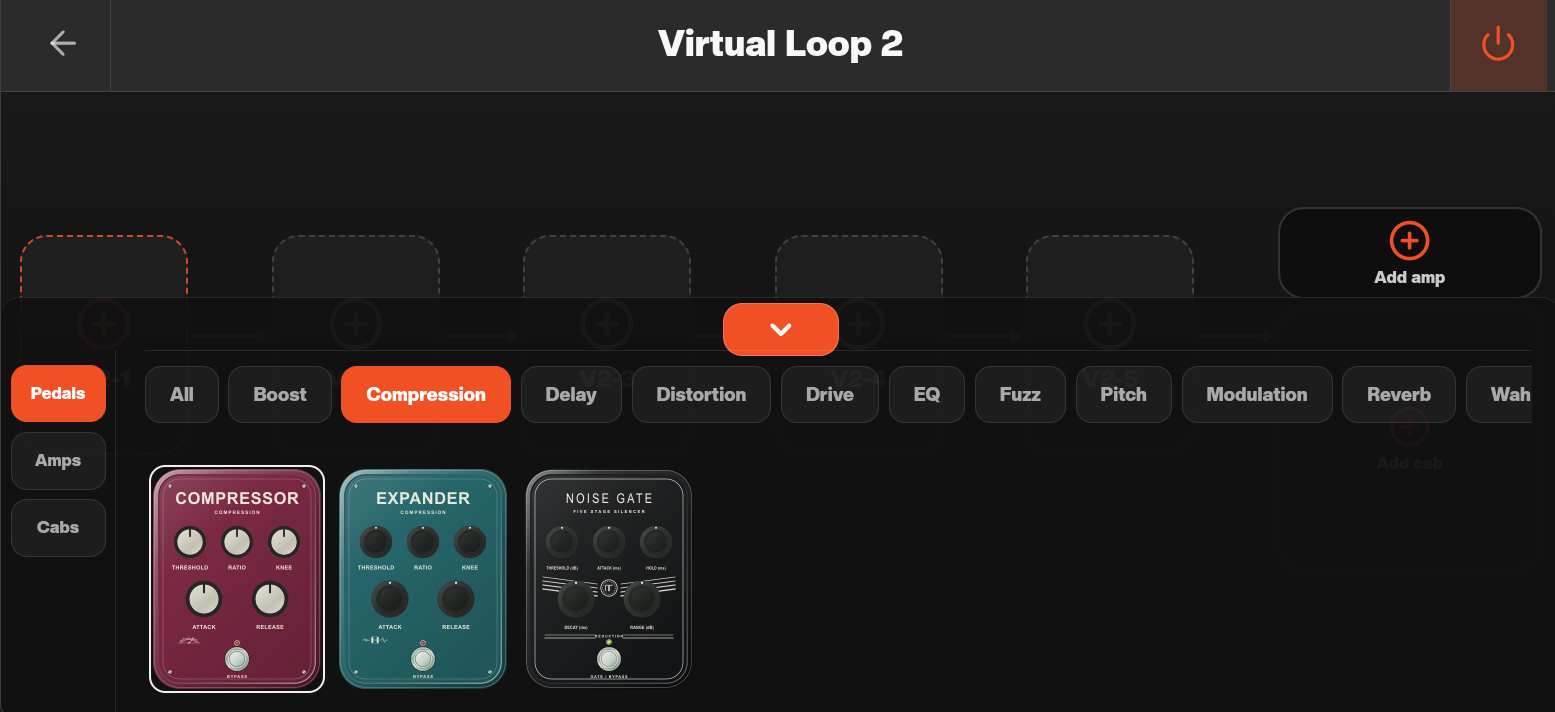 Virtual effect library with Pedals, Amps and Cabs tabs and effect categories
The effect's focus view provides its individual controls. Double-tap a knob to reset it to its default value. The expression assignment panel lets you choose None, EXP1 or EXP2 for the selected parameter. These assignments are saved with the preset and remain active on other pages, as indicated in the panel.
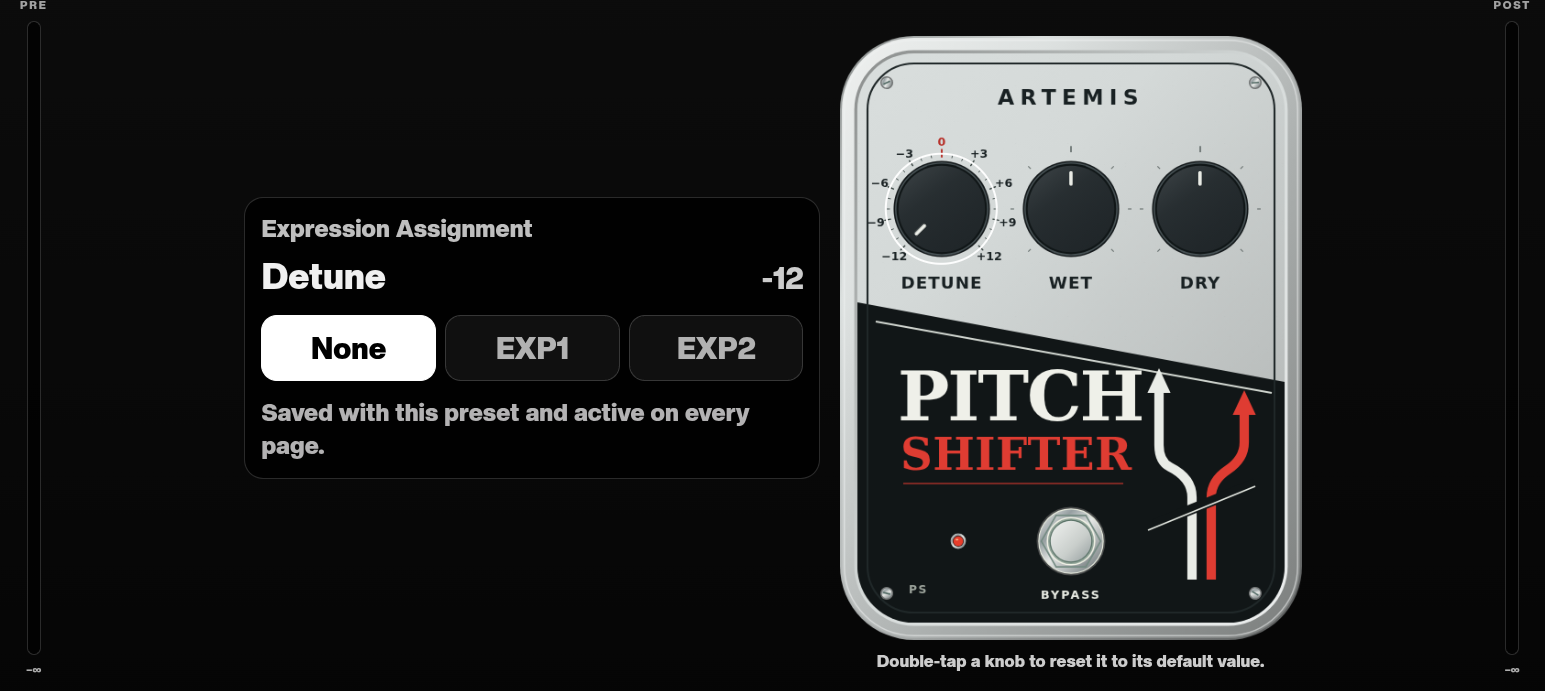 Pitch Shifter focus view with Detune, Wet and Dry controls and an expression assignment panel
Use Add amp and Add cab, or the drawer's Amps and Cabs tabs, when your preset needs those stages. You can build a virtual effects chain without adding an amp or cab. For downloaded captures, follow Downloading NAMs from TONE3000 and Using NAMs in a preset.
The expanded example below contains Pitch Shifter, Echo and Freeverb followed by a NAM amp and a cab. The arrows show the processing order from left to right.
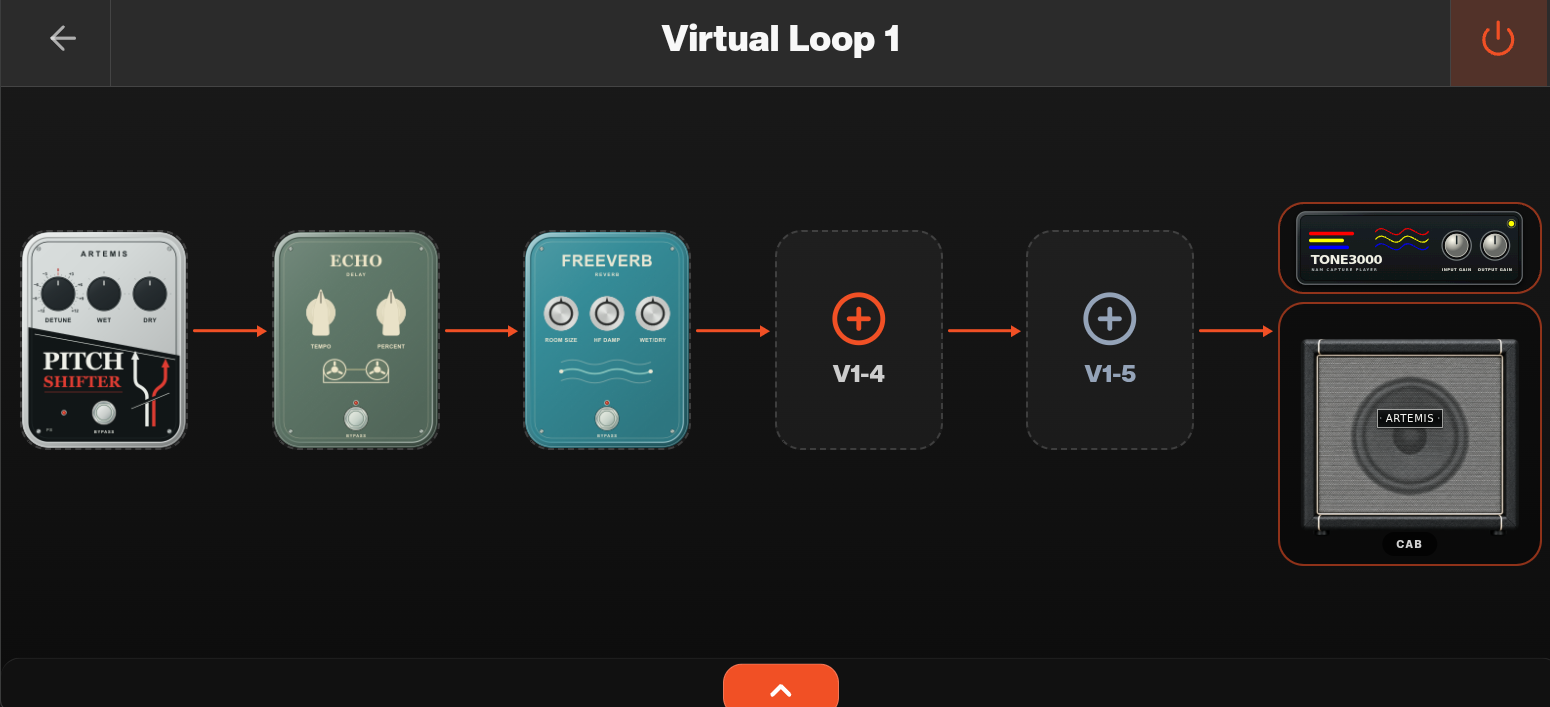 Virtual Loop 1 containing Pitch Shifter, Echo and Freeverb, followed by a NAM amp and a cab
Return to the main routing page using the back arrow. Swipe across a virtual block to preview its contents, or tap it to return to editing. Double-tapping the whole block bypasses that virtual chain; bypassing one effect inside it changes only that effect.
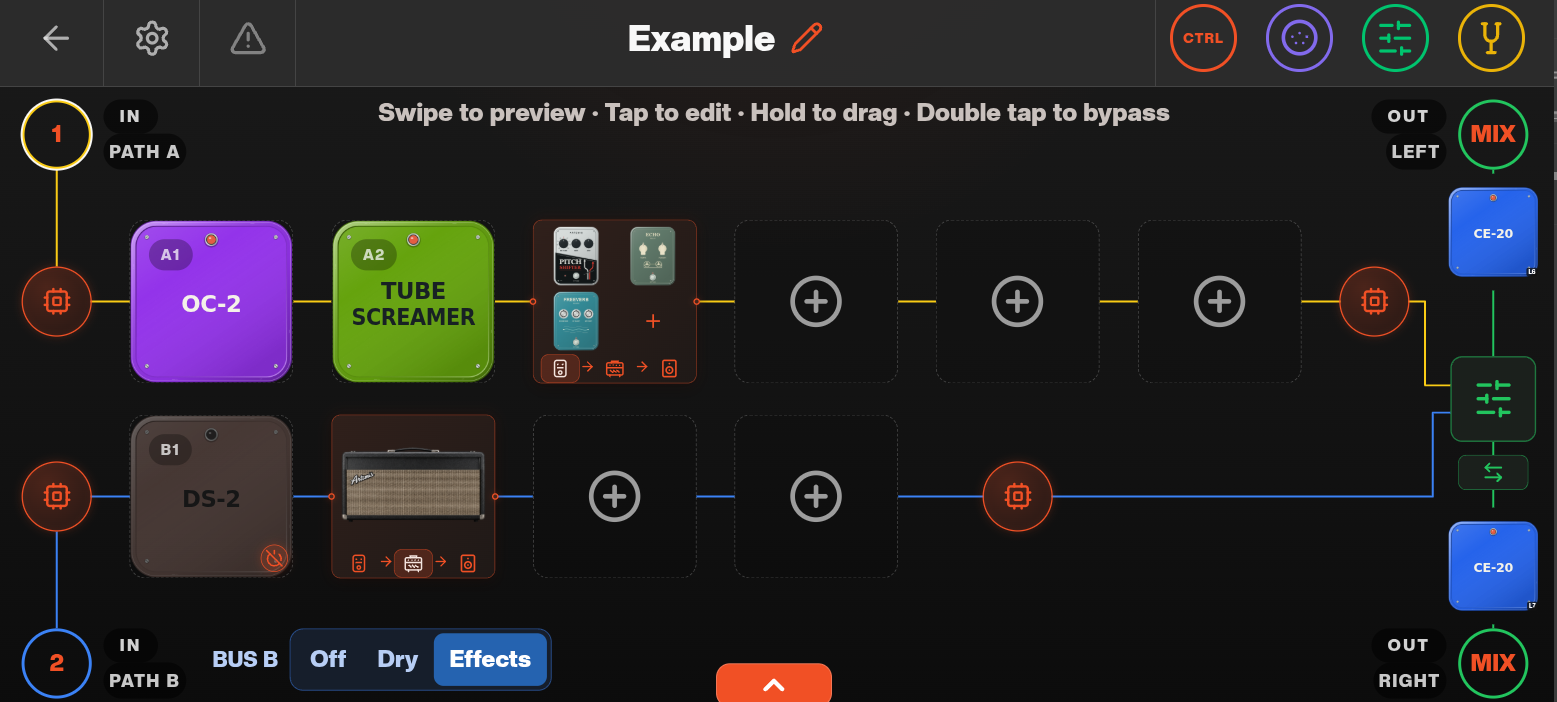 Main routing page showing pedal and amp previews inside the two virtual blocks
5. Check levels, name and save
For the basic walkthrough, follow the route on screen: IN1 → Bus A: OC-2 → Tube Screamer → Virtual 1 at Mid: Echo → Freeverb → mixer → OUT L. Leave unused stages bypassed, including the fixed stereo loop if it is not part of this sound.
- Confirm that the blocks you want to hear are enabled, and that the input and output choices match your cables.
- Open the mixer with the green sliders icon. Compare the preset with its effects bypassed and adjust levels. See Changing preset levels from a song for the mixer controls.
- Set any required CTRL outputs and input-buffer option before saving.
- Tap the pencil beside New Preset and give the sound a descriptive name.
- Leave the editor using the back arrow and accept the save prompt to keep the new preset or your changes to an existing one.
- Recall another preset, then return to this one. Check its routing, bypass states, effect settings and levels to confirm the saved sound is correct.
You can now use the preset in a song. See Creating a song to arrange it alongside your other sounds.
Buses, inputs and outputs
The buses are two signal paths through Artemis. Pedals along one bus process its signal in series. Enabling Bus B lets you run another path alongside Bus A, either from the same input or from the other input.
Choosing the bus inputs
Tap the input circle beside IN PATH A or IN PATH B to cycle between inputs 1 and 2. These correspond to IN1 and IN2 on the rear panel. Choose the input with the connected signal; enabling Bus B does not by itself feed it from Bus A's input.
For one instrument feeding parallel paths, select the same input on both buses. For two separate input signals, select input 1 for one bus and input 2 for the other.
Choosing the Bus B mode
| Mode | Behaviour | Typical use |
|---|---|---|
| Off | Bus B is unused. | A single chain on Bus A. |
| Dry | Bus B provides a path without its own effect chain. | Blend an unprocessed signal with Bus A. |
| Effects | Bus B has positions for physical loops and virtual blocks. | Two processed paths, with either a shared input or separate inputs. |
For a dry blend, select Dry and set both input circles to 1. The screenshot shows OC-2 and Tube Screamer on Bus A, a direct blue path on Bus B, and MIX selected at both outputs. Use the mixer to set the balance between the paths. The fixed stereo effect sits after these paths, so an enabled effect there can still process the combined sound.
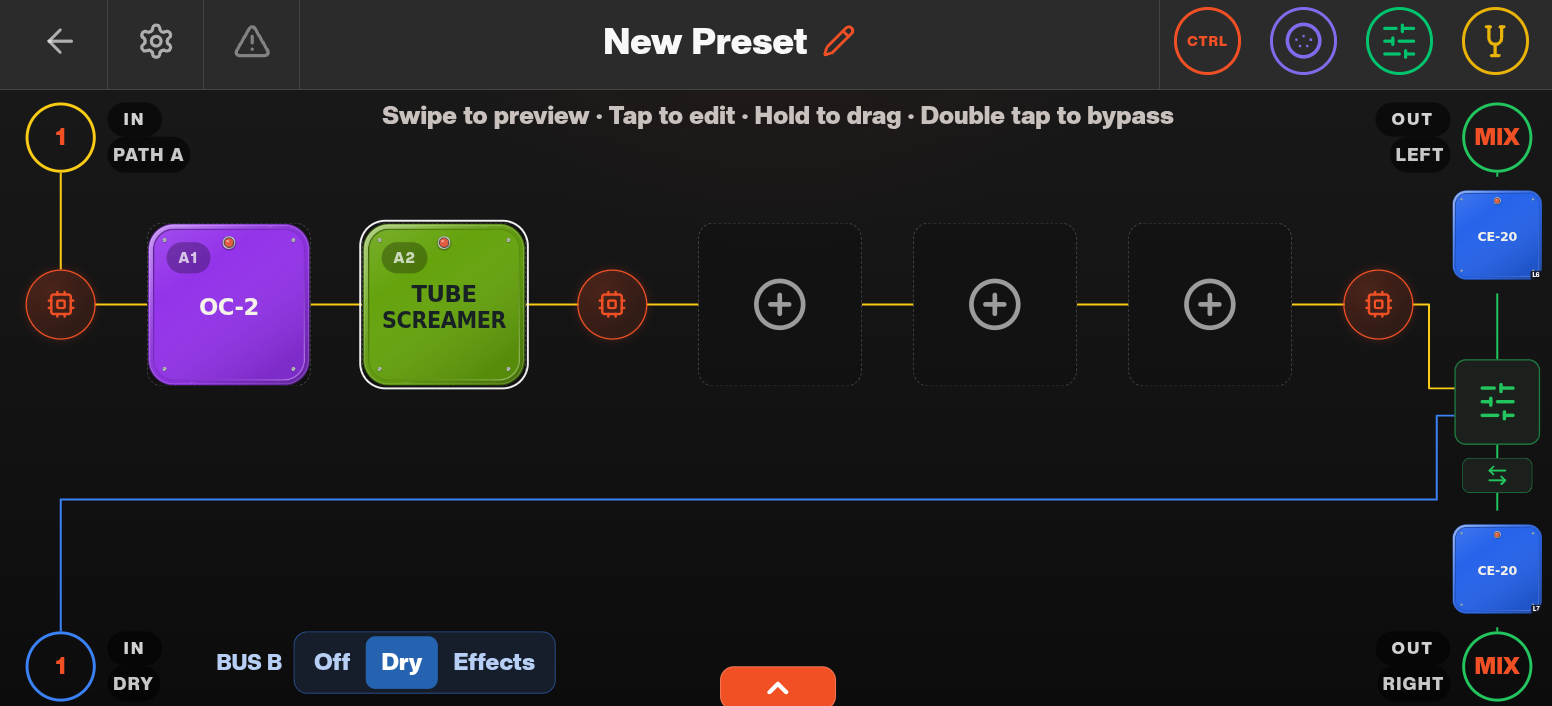 Dry Bus B sharing input 1 with the processed Bus A path and MIX selected at both outputs
Selecting outputs and using the stereo loop
Tap the circles beside OUT LEFT and OUT RIGHT to cycle their routing choices. MIX selects the combined bus mix; the L and R selections shown below keep the left and right routes separate. Check both output selectors whenever you change from a mixed route to a stereo setup.
The stereo example uses input 1 on Bus A and input 2 on Bus B, with Effects enabled and the outputs showing L and R. To feed both paths from one instrument instead, choose that instrument's input for both buses.
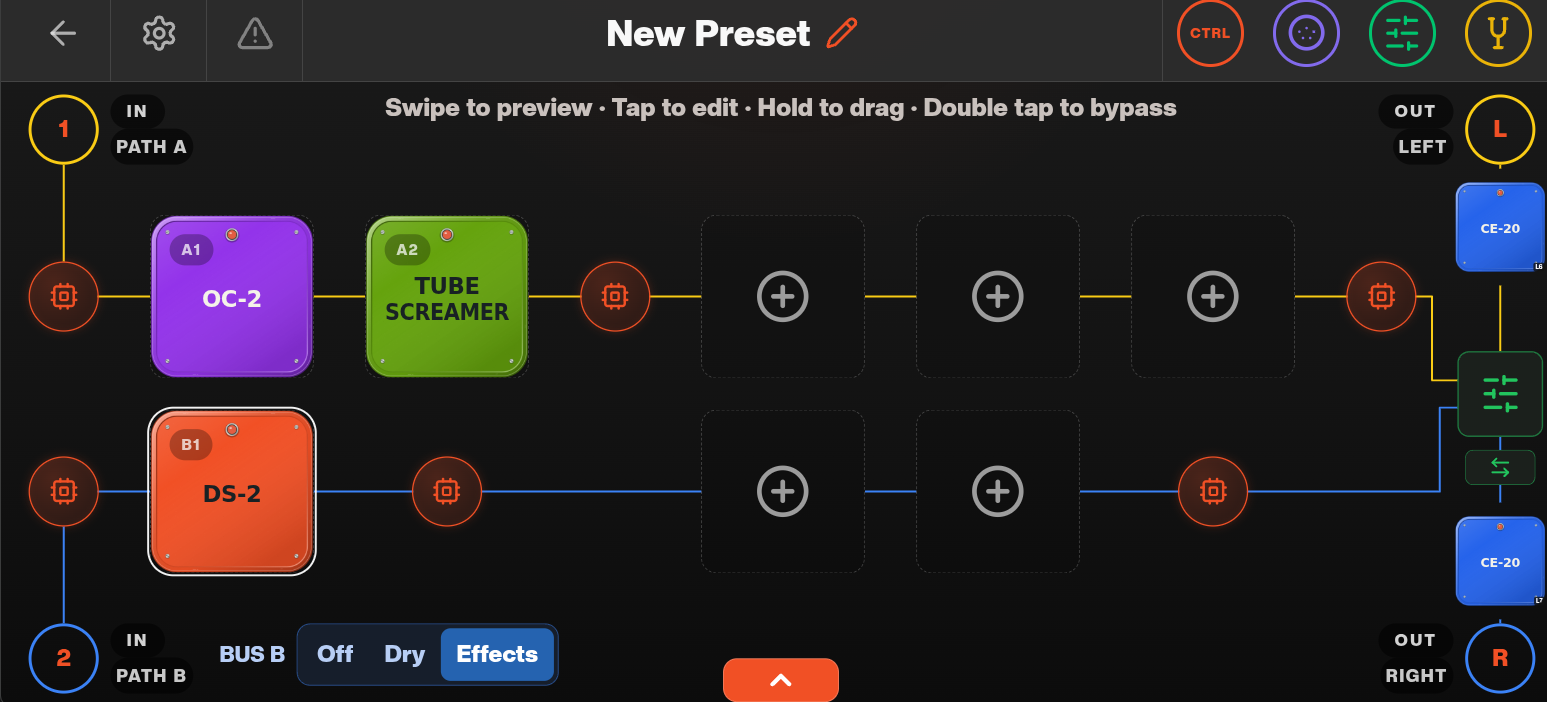
The small pedal cards at the right represent L6/L7, the fixed stereo loop. They stay at the end of the route rather than moving into the five reorderable positions. Connect a stereo pedal's left and right channels to the matching sends and returns, and check its bypass state when you want it included in the preset.
CTRL outputs
Use CTRL 1 and CTRL 2 to switch compatible external equipment, such as an amplifier channel, as part of a preset. These are relay-contact control connections; their action depends on the connected equipment's footswitch input.
- Connect the appropriate CTRL socket to the compatible device's switching input. See Rear Panel Connections for the sockets and cable type.
- Tap CTRL in the Preset Editor's top bar.
- Tap 1 or 2 to set the required output state. In the screenshot, 2 is highlighted orange and 1 is inactive.
- Check the response of the connected device, then save the preset. Both CTRL states are saved with the preset.
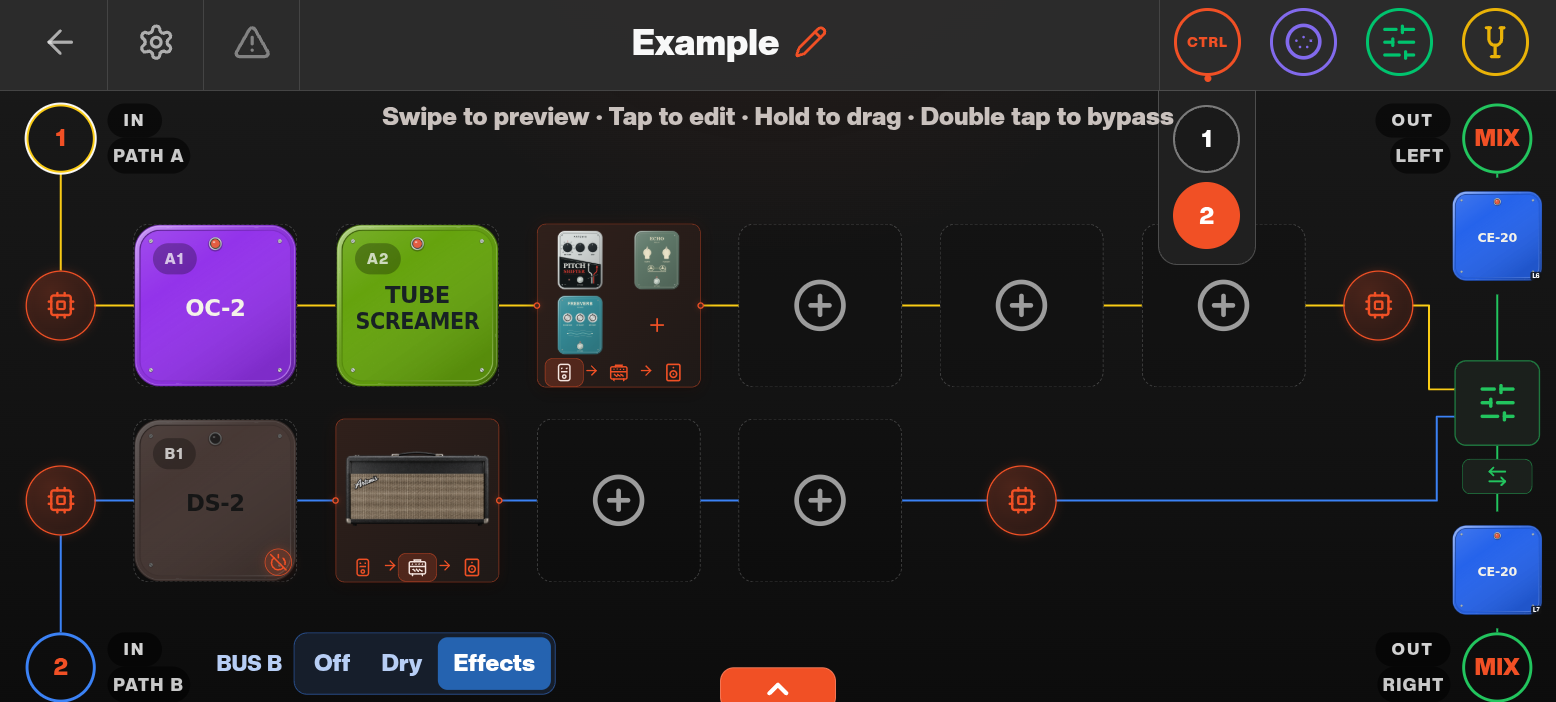 CTRL menu open with control output 2 active and output 1 inactive
For example, two presets can use different CTRL 1 states to select different channels on a compatible amplifier while also changing the effects route.
Disabling input buffers
The warning-triangle icon in the Preset Editor toggles the input buffers. The setting applies to both inputs together and is saved with the preset.
- Tap the warning-triangle icon to disable the buffers.
- Read the Disable input buffers? dialog. Bypassing the buffers changes the analogue input path and may change the signal level or tone.
- Tap Disable buffers to proceed, or Cancel to keep the current state.
- Compare the sound and levels. Use the same triangle control to turn the buffers back on when needed.
- Save the preset to retain your chosen buffer state.
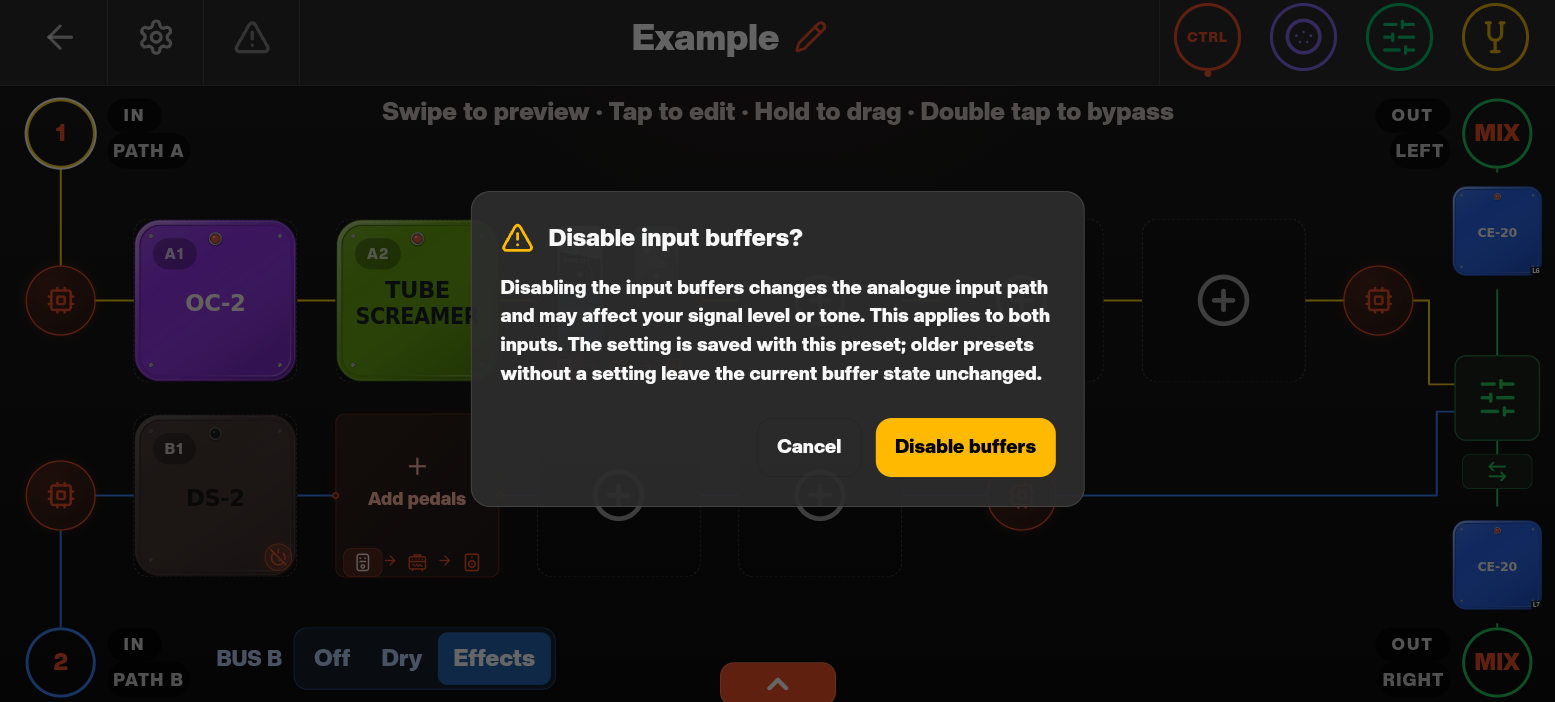
Older presets without a stored buffer setting leave the current buffer state unchanged. Check the setting explicitly when updating an older preset.
Editing and managing presets
Open Preset Manager → Library to find a saved preset. Use the search and sorting controls to locate it, then choose Edit to open its route and settings. Save when prompted on leaving the editor to keep your changes.
Presets are shared library entries. Editing a preset used by several songs changes that sound in all of them. To make a variation for one song, use Duplicate in the library, edit and name the copy, then assign that copy to the song slot.
The library supports folders for organising presets. Choose the destination folder before creating a preset, and use names and tags that make the sound easy to recognise. A duplicate is created alongside the original with a distinct name.
The trash button deletes the library preset immediately. Archive your data before removing sounds you may need again. Check songs that use a deleted preset and replace their missing assignments; removing a preset from a song slot is a separate operation from deleting it from the library.