Common Settings and Preferences
On this page
Use these pages to set up the controls and display for the way you play. To enable a footswitch hold action, open Footswitches, select a switch and choose a function in its Hold row. Follow Enabling footswitch hold actions below.
Opening the settings pages
- Briefly press the tl logo button to open the Home pop-up.
- Tap Settings.
- Choose a page using the icons at the top right, or move through the pages with the orange side arrows. The settings gear at the top left is highlighted orange while you are in this area.
| Top-right icon | Page | Common uses |
|---|---|---|
| Power symbol | Power | Power and application controls. For shutdown, see Shut down. |
| Blue vertical sliders | Preferences | Screen brightness, tuner appearance and MIDI input settings. |
| Green footswitch symbol | Footswitches | Press, Invert Menu and hold actions; hold duration. |
| Yellow light bulb | LEDs | Footswitch LED brightness, behaviour, animation and colours. |
| Cyan horizontal sliders | Expression / Control | Enable expression sources, calibrate their travel and adjust response. |
| Purple palette | Palettes | Default colours for presets, songs, setlists, footswitch functions and physical pedals. |
These settings apply across Houston and are saved as you change them. You do not need to save a song or preset to keep them. Expression parameter assignments are still saved with each preset; the Expression / Control page sets up the source that drives those assignments.
Footswitch settings
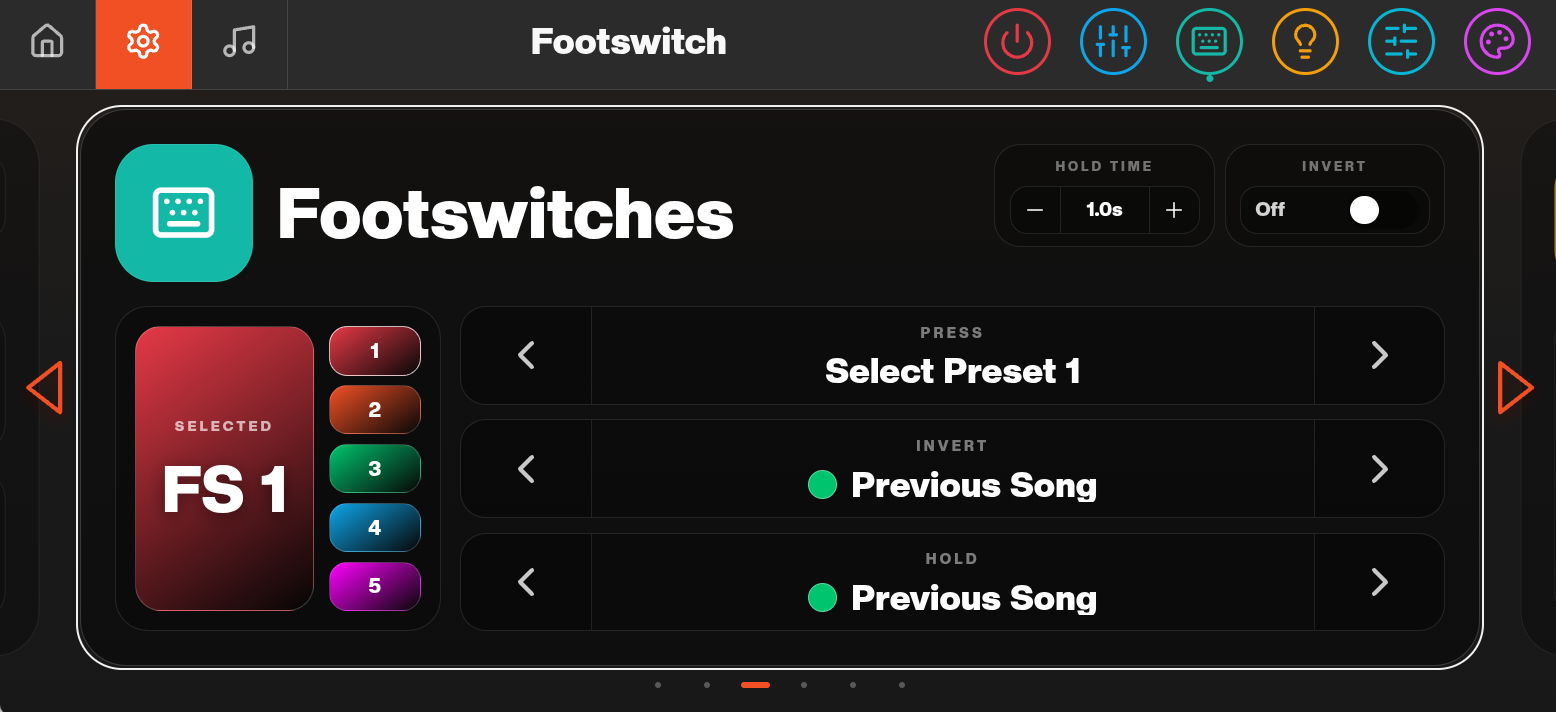
Open Settings → Footswitches using the green footswitch icon. First choose the switch you want to edit using the numbered buttons on the left.
Enabling footswitch hold actions
For example, to open the tuner by holding footswitch 3:
- Select 3 in the numbered column. Check that the large tile reads FS 3.
- In the bottom Hold row, use the left/right arrows to select Toggle Tuner.
- Set Hold Time at the top right to 1.0s as a starting point. Use − or + to change it.
- Return to the normal Jam Page, with Stompbox Mode and the recorder closed.
- Hold footswitch 3 for at least the selected time. The tuner should open.
Repeat for other switches with the actions you want. Choose No Action in a switch's Hold row to disable its hold action.
Hold Time sets the duration for all five footswitches; the Hold row sets the action for the selected switch. The top-right Invert toggle controls the Invert Menu mode, not whether holds are enabled. You can use hold actions with Invert set to Off.
Footswitch control labels
| Label / position | What it does |
|---|---|
| 1–5, beside the large selected-switch tile | Select which footswitch you are editing. Changing the selection does not copy assignments between switches. |
| Press, top assignment row | Choose the selected switch's normal short-press action. On the Jam Page, pressing the already active sound preset still opens the Invert Menu. |
| Invert, middle assignment row | Choose the short-press action used while the Invert Menu is active. Footswitch 5's Invert action stays Exit so you can leave the menu. |
| Hold, bottom assignment row | Choose the action triggered by holding the selected switch. No Action disables that switch's hold function. |
| Hold Time, upper right | Set how long a press must last to count as a hold: 0.5–10 seconds, in 0.5-second steps. |
| Invert, upper-right On/Off toggle | Switch between normal and Invert Menu operation. This is separate from editing an Invert assignment. |
The screenshot selects FS 1: a normal press selects preset 1, while its Invert and Hold actions are both Previous Song. These are separate assignments even when they show the same function.
Test song-navigation actions with a setlist loaded. If a hold seems inactive, check the selected switch's Hold assignment and duration, then test on the normal Jam Page. Stompbox Mode, the recorder, libraries and settings pages use their own footswitch controls. See Footswitches and LEDs for the default performance assignments.
Preferences: screen, tuner and MIDI
Open Settings → Preferences using the blue vertical-sliders icon.
Screen brightness
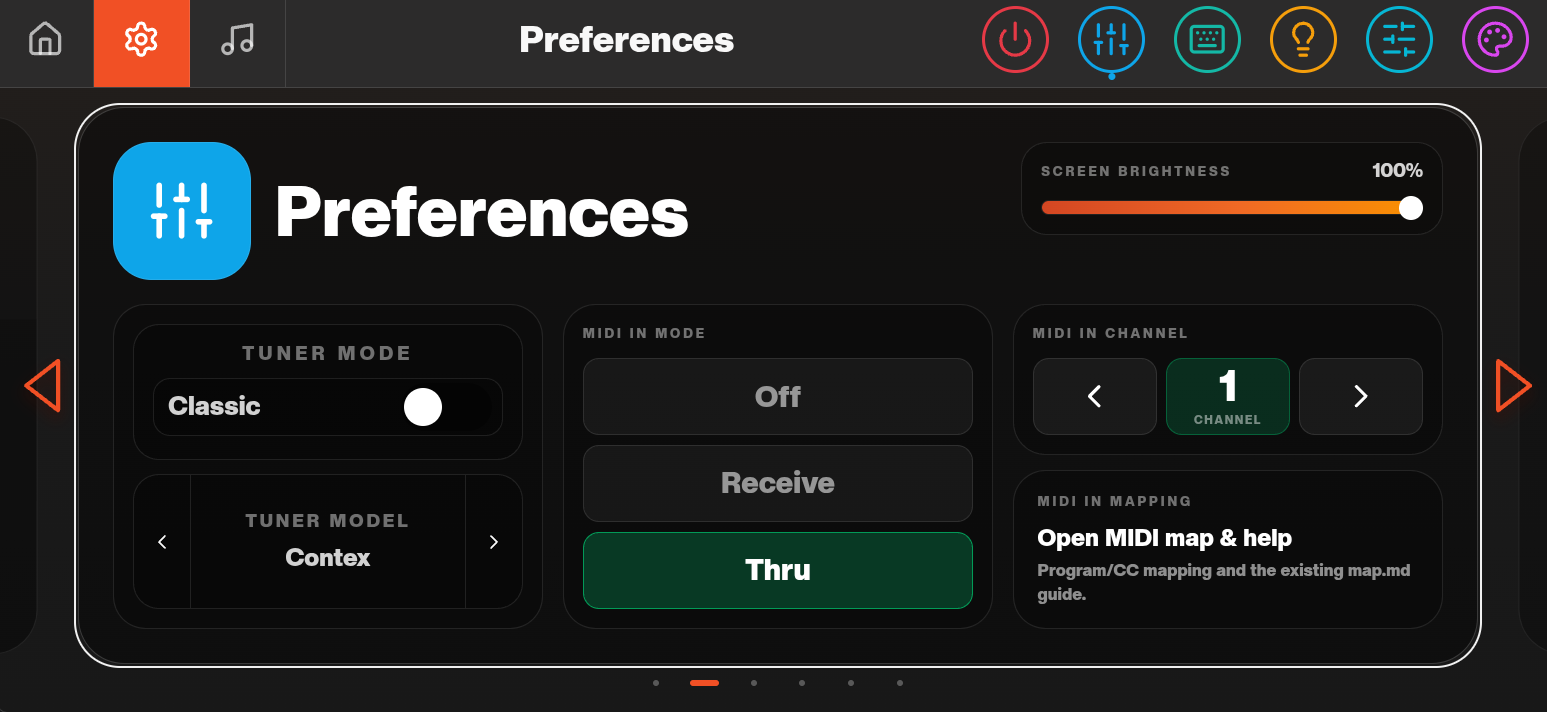
Use Screen Brightness in the upper right to adjust the touchscreen's brightness. The percentage shows the current setting. Footswitch LED brightness is adjusted separately on the LED settings page.
Tuner appearance
| Label | What it does |
|---|---|
| Tuner Mode, upper left | Choose Classic or Full Screen for the tuner view. Full Screen opens the dedicated full-screen tuner. |
| Tuner Model, below Tuner Mode | Use the arrows to choose Classic, Contex or Helike as the tuner presentation. |
Open the tuner after changing these settings to compare the views. The screenshot uses Classic mode with the Contex model; mode and model are separate choices.
MIDI input settings
| Label | What it does |
|---|---|
| MIDI In Mode → Off | Disable mapped incoming MIDI control. |
| MIDI In Mode → Receive | Let an external MIDI controller control Artemis. |
| MIDI In Mode → Thru | Receive mapped commands and forward incoming MIDI to downstream equipment. |
| MIDI In Channel, upper right | Use the arrows to choose channel 1–16, matching the controller sending commands to Artemis. |
| Open MIDI map & help, lower right | Open the receive map to find the PC or CC message for an action or library item. |
For a first external-controller setup, choose Receive, match the MIDI channel and test one message. The screenshot's Thru selection is an example, not a requirement. Follow MIDI connections and channel setup for wiring and message setup.
LED settings
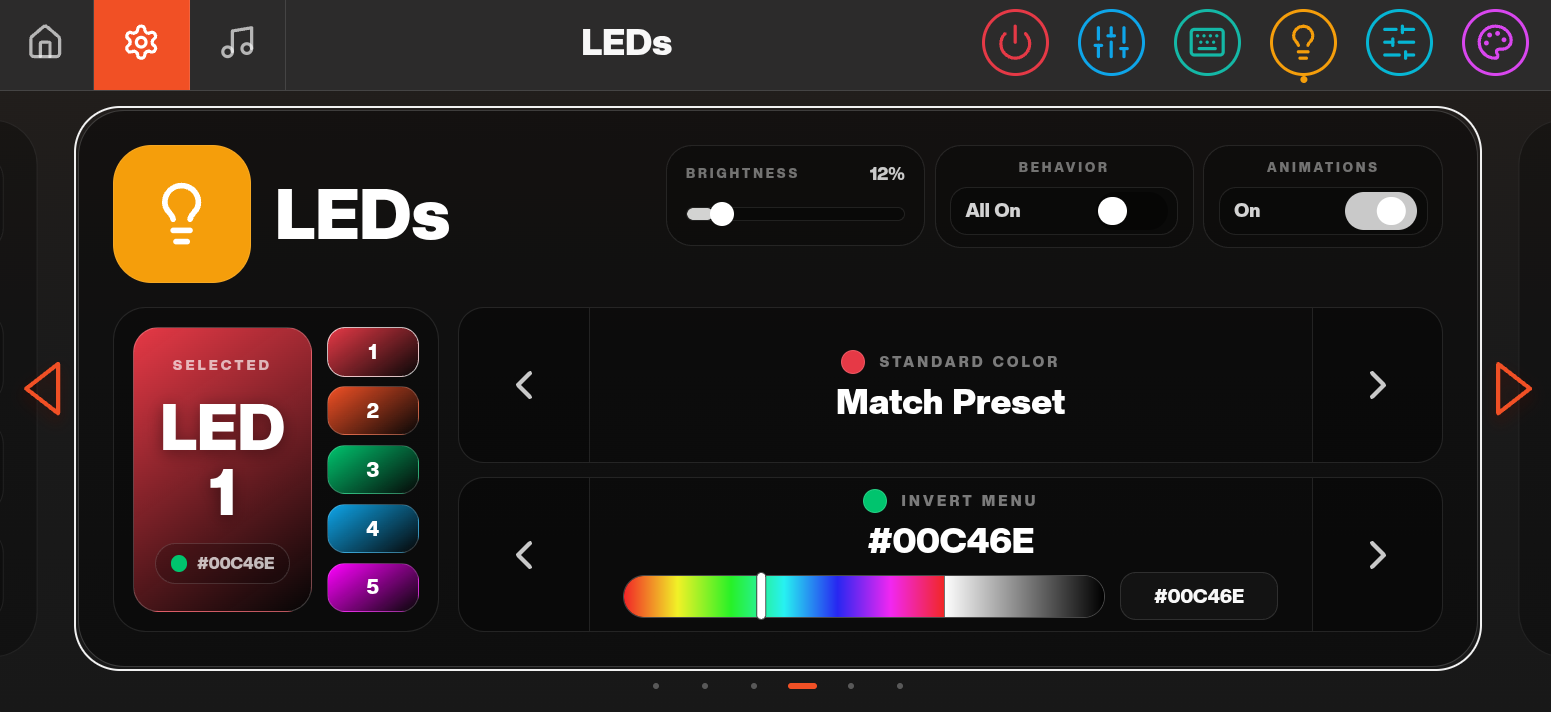
Open Settings → LEDs using the yellow light-bulb icon. Select LED 1–5 on the left before changing its colour settings.
Brightness, behaviour and animations
| Label, across the top | What it does |
|---|---|
| Brightness | Adjust the brightness of the five footswitch LEDs together. The screenshot's 12% is an example; choose a level visible in your playing environment. |
| Behavior | All On shows occupied song slots, with the active sound preset indicated in white. Active Only lights the active sound slot; active utilities can also remain indicated. |
| Animations | Enable or disable LED animations such as pulsing. This changes the visual feedback, not the footswitch assignment. |
Standard and Invert Menu colours
| Label / position | What it does |
|---|---|
| 1–5, beside the selected-LED tile | Select the individual LED to edit. |
| Standard Color, upper row | Choose Match Preset to follow the preset colour, or Custom Hex to choose a fixed colour. |
| Invert Menu, lower row | Choose Match Standard to reuse the standard colour, or Custom Hex for a separate menu colour. |
| Colour strip and hex field | When a custom colour is selected, use the strip or enter its hexadecimal colour value, such as #00C46E. |
For a simple setup, leave Standard Color on Match Preset and give each Invert Menu action a recognisable colour. Check both the normal Jam Page and Invert Menu afterwards. The Palettes page controls shared default colour choices; this page configures individual hardware LEDs.
Expression settings
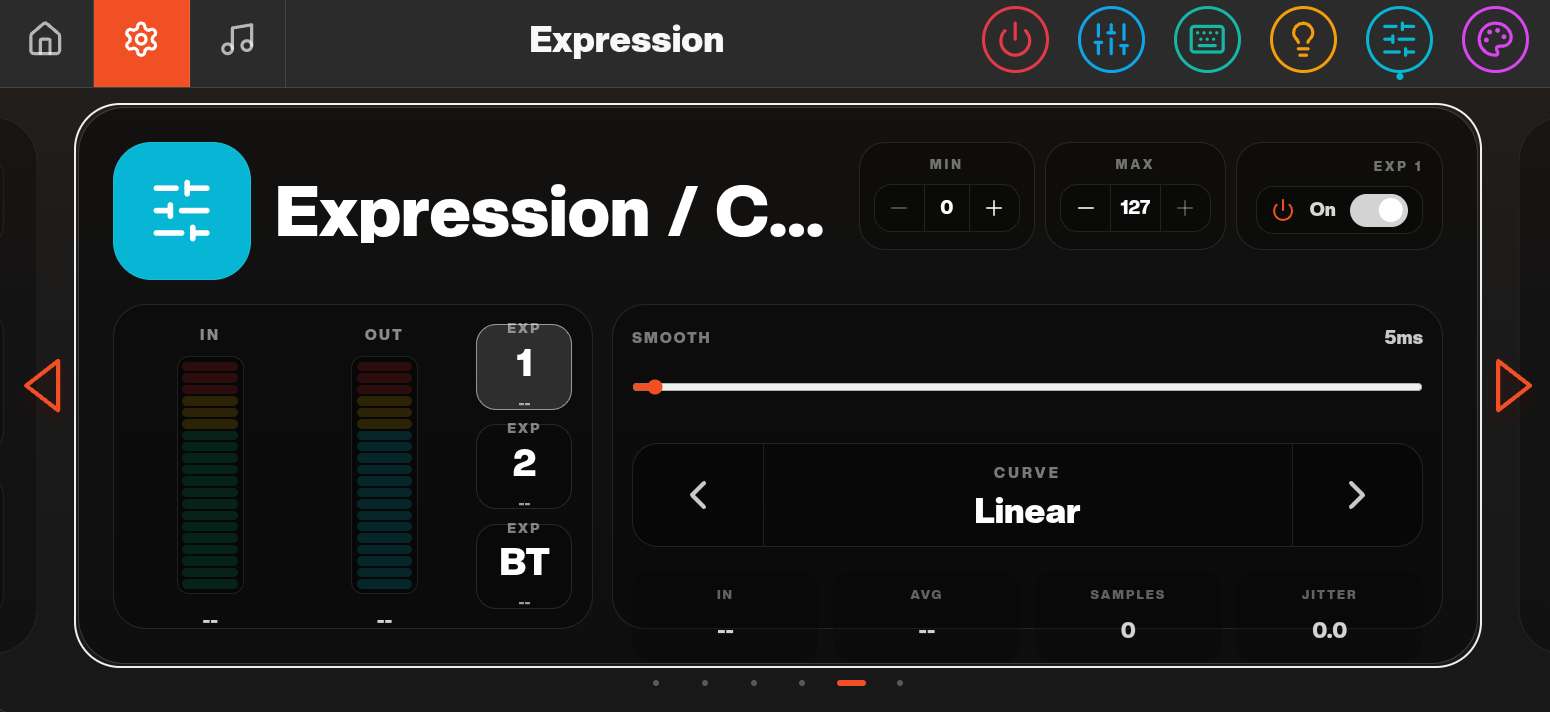
Open Settings → Expression / Control using the cyan horizontal-sliders icon. The page heading may be shortened to Expression or Expression / C… on screen.
Choose and enable an expression source
Select EXP 1 or EXP 2 beside the meters to match the rear-panel socket. Turn that source On using the upper-right toggle. Each source has its own settings; check the source number above the toggle before editing.
Calibration and response controls
| Label / position | What it does |
|---|---|
| Min / Max, upper right | Set the low and high incoming values that correspond to the pedal's usable travel. Keep them different. |
| In, left meter | Show the incoming value before calibration and response shaping. |
| Out, right meter | Show the resulting control value after the source settings are applied. |
| Smooth, horizontal slider | Average movement over the selected time. More smoothing reduces jitter but makes the response less immediate. |
| Curve, arrow selector | Choose Linear, Slow Start, Fast Start or S-Curve to shape the response through the travel. |
| In / Avg / Samples / Jitter, bottom readings | Show the incoming value, averaged value, recent sample count and variation between recent readings. Use these to check whether a source is sending a steady signal. |
Move the pedal while watching In, set Min/Max to its measured endpoints, then check that Out covers the intended 0–127 range. Start with a Linear curve and modest smoothing. The screenshot shows no incoming readings yet; its -- values and 0 samples are not a completed calibration.
Enabling a source does not assign it to a sound control. Follow Expression calibration and assignment to calibrate it and assign a mixer or effect parameter, then save that assignment with the preset.
Colour palettes
Open Settings → Palettes using the purple palette icon.
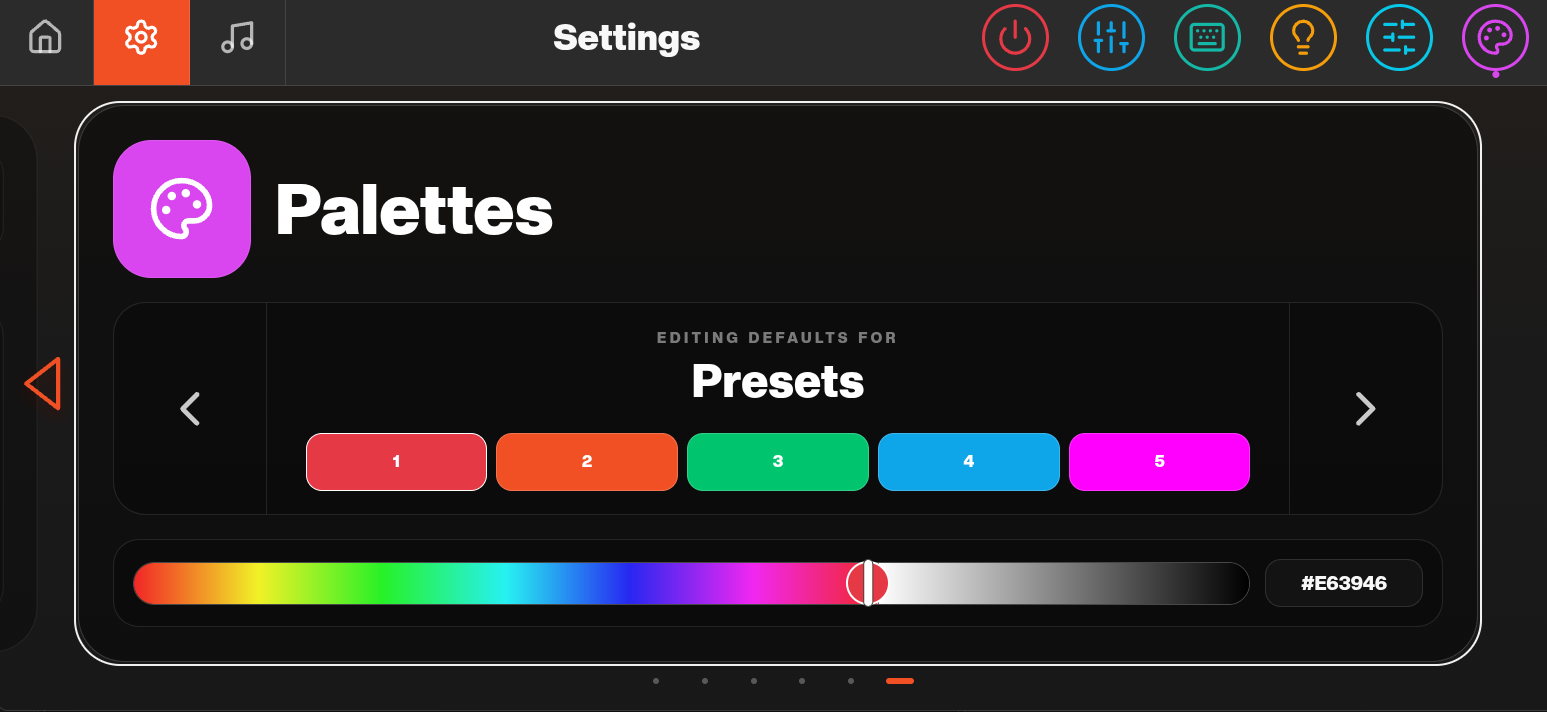
Use this page to choose default colours that make your sounds and controls easy to recognise.
| Label / position | What it does |
|---|---|
| Editing Defaults For, with left/right arrows | Select Presets, Songs, Setlists, Footswitch Functions or Real Pedals. |
| Numbered colour swatches | Select the colour entry to edit within that group. The selected swatch has a highlighted outline. |
| Colour strip, along the bottom | Choose a colour for the selected entry. |
| Hex field, bottom right | Enter an exact colour, such as #E63946, when you want to reuse it consistently. |
To change a preset default, choose Presets, tap the required numbered swatch, then adjust the strip or hex value. Repeat for the other entries you want to change. The screenshot is editing preset colour 1.
Palettes supply default colour choices. To change an individual saved preset or pedal's colour, edit that item. To adjust hardware LED brightness or give one LED a custom colour, use LED settings.