Playing Live
On this page
Use the Jam Page to prepare and perform songs. The walkthrough below starts with saved presets, places them into a five-slot song layout, and shows how to add utilities and balance your sounds.
Jam Page overview
Open a saved song using Open a song in the Home pop-up, or open Song Manager → Library from the home carousel. The song opens on the Jam Page.
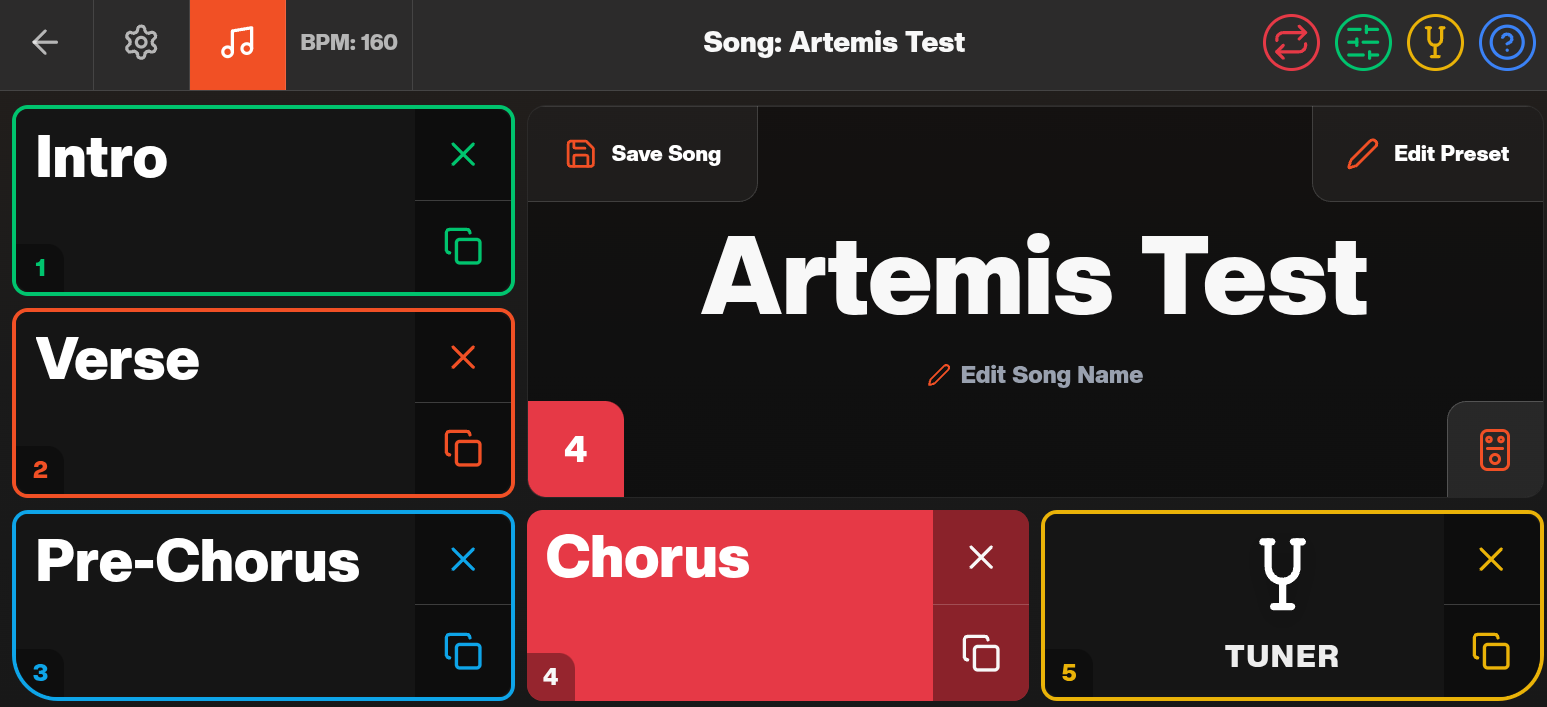 Jam Page showing the song Artemis Test, four presets and a Tuner utility, with Chorus selected
The five numbered tiles correspond to Artemis's five footswitches. Tap a preset tile or press its corresponding footswitch to recall that sound. A utility tile performs its assigned action. In this example, slots 1–4 contain Intro, Verse, Pre-Chorus and Chorus, and slot 5 opens the tuner.
Press the already active preset's footswitch again to open the Invert Menu for quick access to song navigation, the tuner and the recorder.
The selected preset tile is filled with its colour, and its slot number appears in the main display. Here, the red Chorus preset in slot 4 is selected. The saved song's name appears in the main display and top bar; the top bar can also show the tempo in BPM.
| Control | Use |
|---|---|
| Add Preset in an empty slot | Choose a preset or utility for that slot. |
| Save as Song / Save Song | Name and save a new song, or save changes to the current song. |
| Edit Song Name | Change the song's name. Save the song afterwards. |
| Edit Preset | Open the selected sound in the Preset Editor. |
| Green sliders icon in the top bar | Open the selected preset's mixer to adjust levels and expression assignments. |
| Yellow tuning-fork icon | Open the tuner. |
| Red opposing-arrows icon | Open the recorder. |
| Pedal icon at the lower right of the main display | Toggle Stompbox Mode. |
| × on a slot | Remove that entry from the song layout. |
Keep the slot arrangement consistent across songs where practical. For example, using slot 1 for your opening sound and slot 5 for a utility makes the layout easier to remember during a performance.
Invert Menu
The Invert Menu gives the five footswitches a set of performance shortcuts, so you can reach song navigation, the tuner and the recorder without assigning them to slots in your song.
- Select a preset on the Jam Page using its footswitch.
- Press that same footswitch again while the preset is active. The five tiles change to the Invert Menu actions shown below.
- Press the footswitch for the action you want, or tap its on-screen tile.
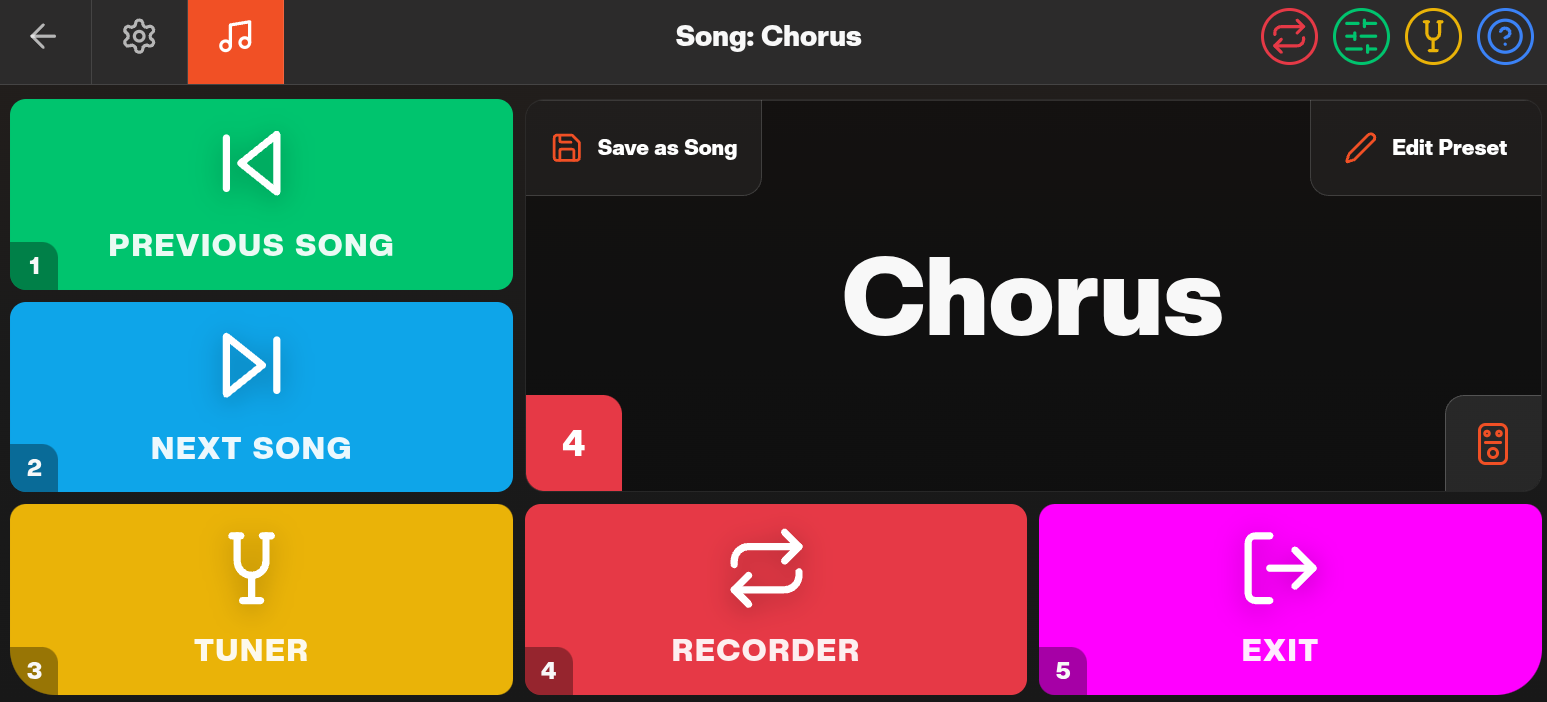
| Footswitch | Action | Use |
|---|---|---|
| 1 | Previous Song | Load the previous song in the setlist. |
| 2 | Next Song | Load the next song in the setlist. |
| 3 | Tuner | Open the tuner. |
| 4 | Recorder | Open the recorder. |
| 5 | Exit | Close the Invert Menu and return to the song's preset and utility tiles. |
For example, if Chorus in slot 4 is active, press footswitch 4 again to open the menu. The footswitches now follow the menu labels: footswitch 3 opens the tuner, while footswitch 5 exits the menu. Use Previous Song and Next Song when working through a setlist.
You can still assign utility presets directly to song slots when you want an action available with a single press from the normal song view.
Creating a song
Before starting, set up My Pedalboard and save the sounds you need using the Preset Editor. This example uses four presets named Intro, Verse, Pre-Chorus and Chorus; use your own saved presets if you prefer.
1. Create an empty song
Open the home carousel, find Song Manager, and tap Create. Use Library when you want to open an existing song instead.
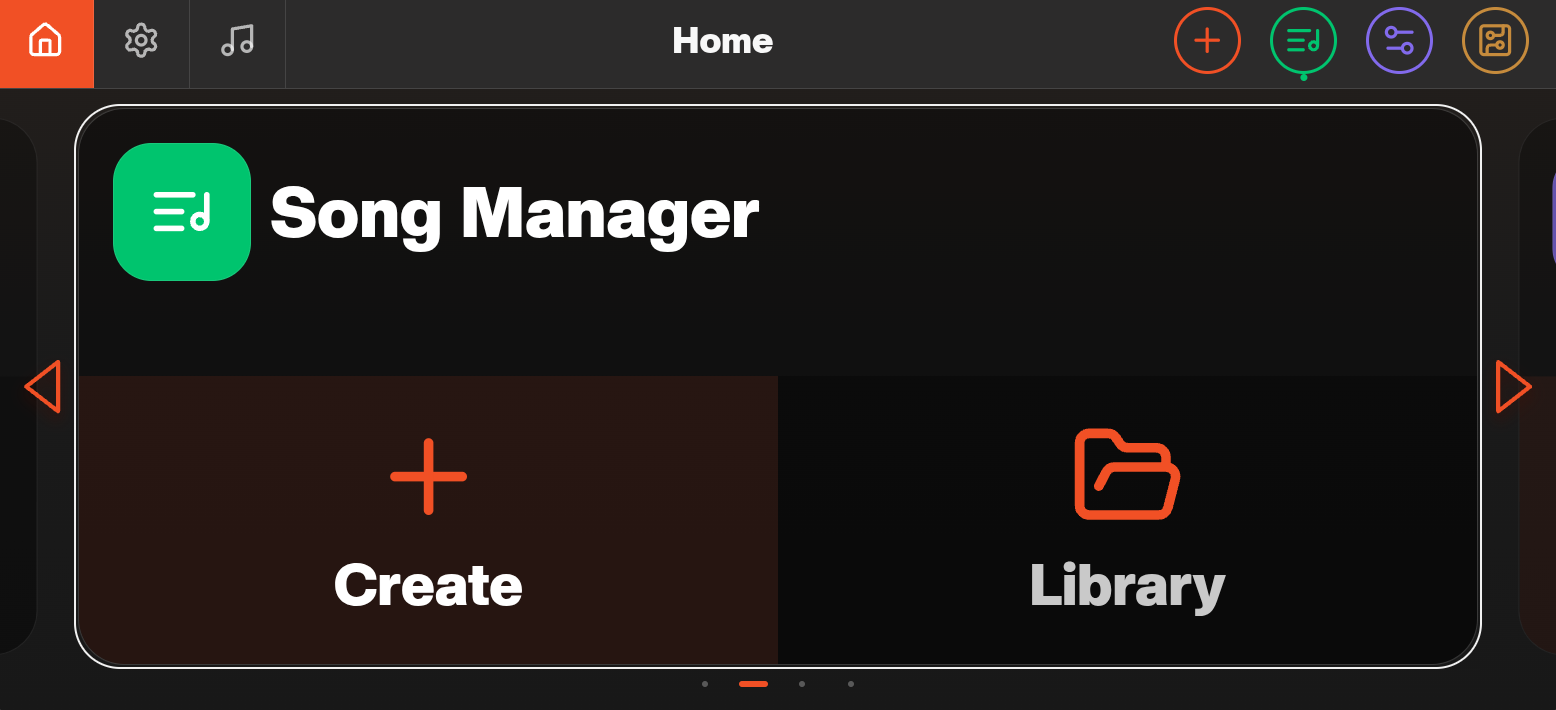 Song Manager in the home carousel, with Create and Library buttons
A new song opens with five empty Add Preset slots. The main display asks you to select or add a preset.
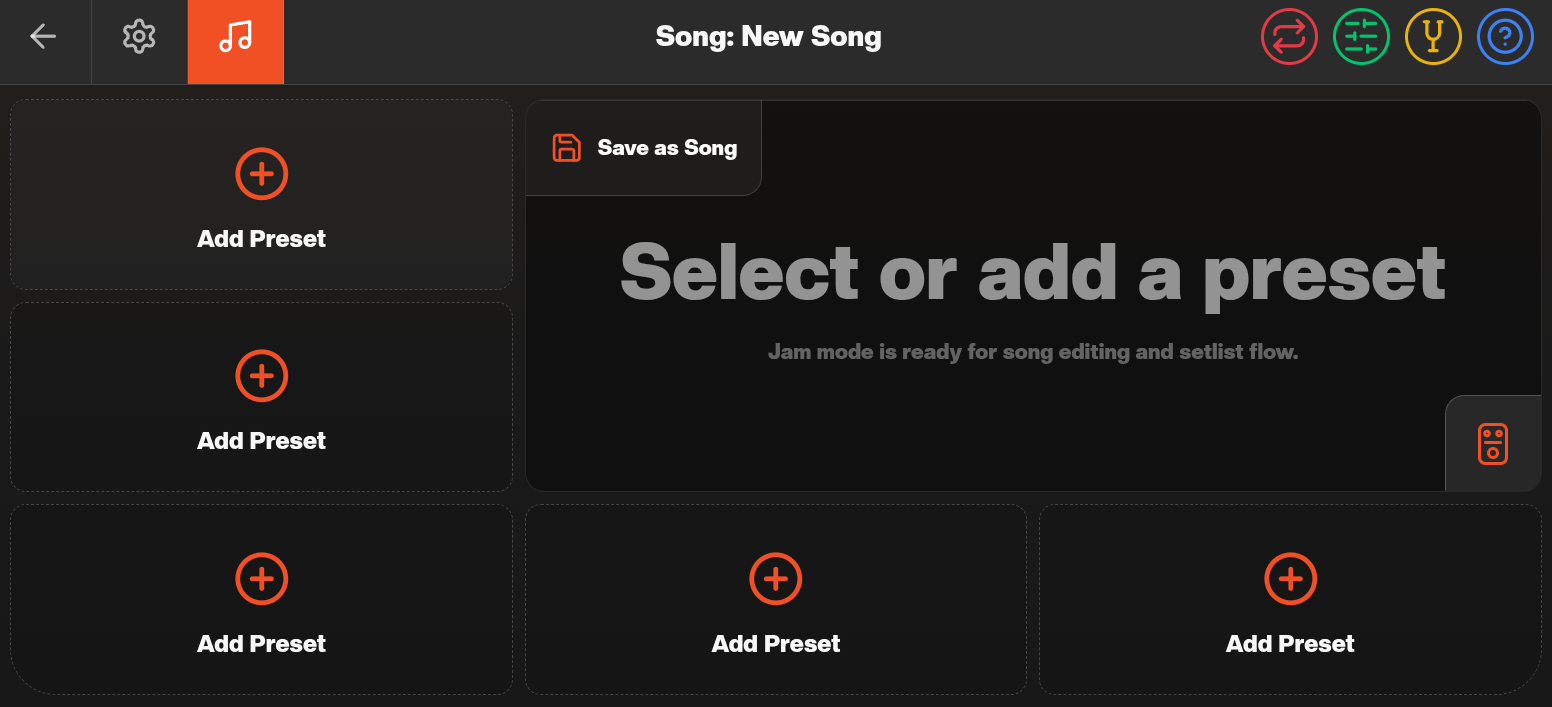 New song with five empty Add Preset slots
2. Add your sounds in performance order
- Tap Add Preset in the first slot.
- Find Intro in the preset picker and tap its card. Use Search presets… or the Recent, Name and Tag controls to find a sound. Choose Create New Preset if you need to make a new sound first.
- Repeat for the other slots, following the layout below.
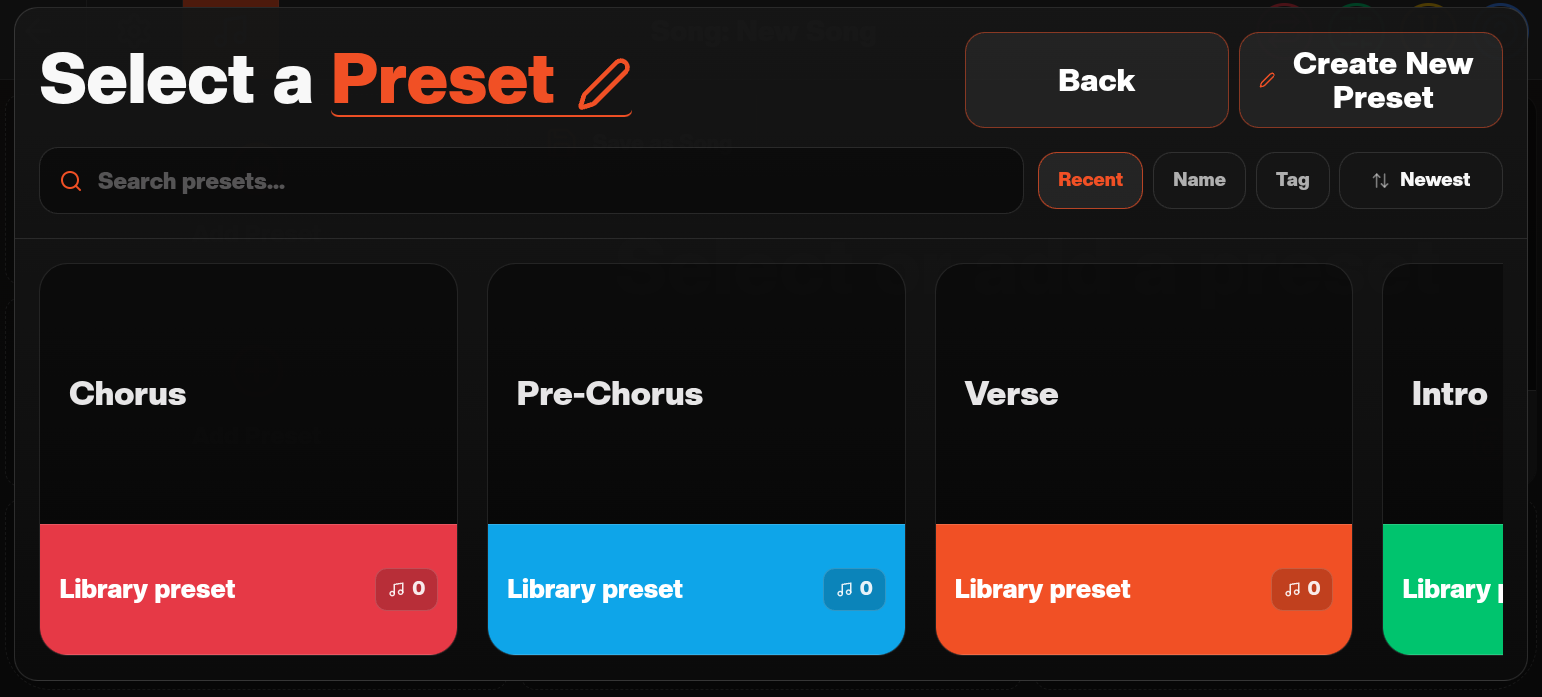 Preset picker showing Chorus, Pre-Chorus, Verse and Intro library presets
| Slot / footswitch | Example assignment |
|---|---|
| 1 | Intro |
| 2 | Verse |
| 3 | Pre-Chorus |
| 4 | Chorus |
| 5 | Next Song utility |
Choose the destination slot first, then choose its preset. The order of cards in the preset picker is the library's display order; it does not determine the song layout.
For slot 5, tap Add Preset, then tap the highlighted Preset heading to switch to the utility picker. Select Next Song. See Utility presets for the other actions. If you are practising a single song, you could use Tuner in this slot instead, as shown in the Jam Page overview.
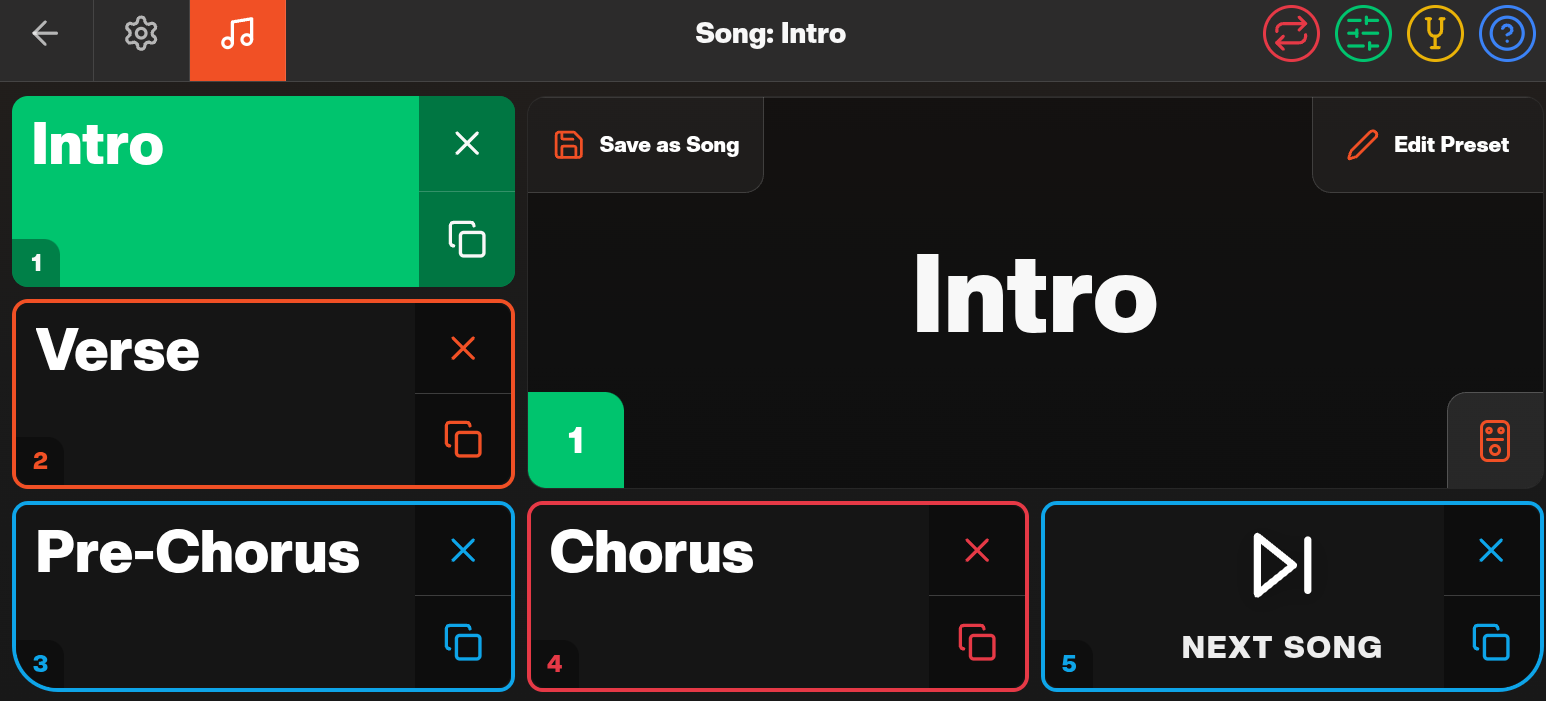 Song layout with Intro, Verse, Pre-Chorus, Chorus and Next Song assigned to slots 1–5
3. Name and save the song
- Tap Save as Song.
- Enter a descriptive Song name in the Save this song? dialog.
- Tap Save to keep the song.
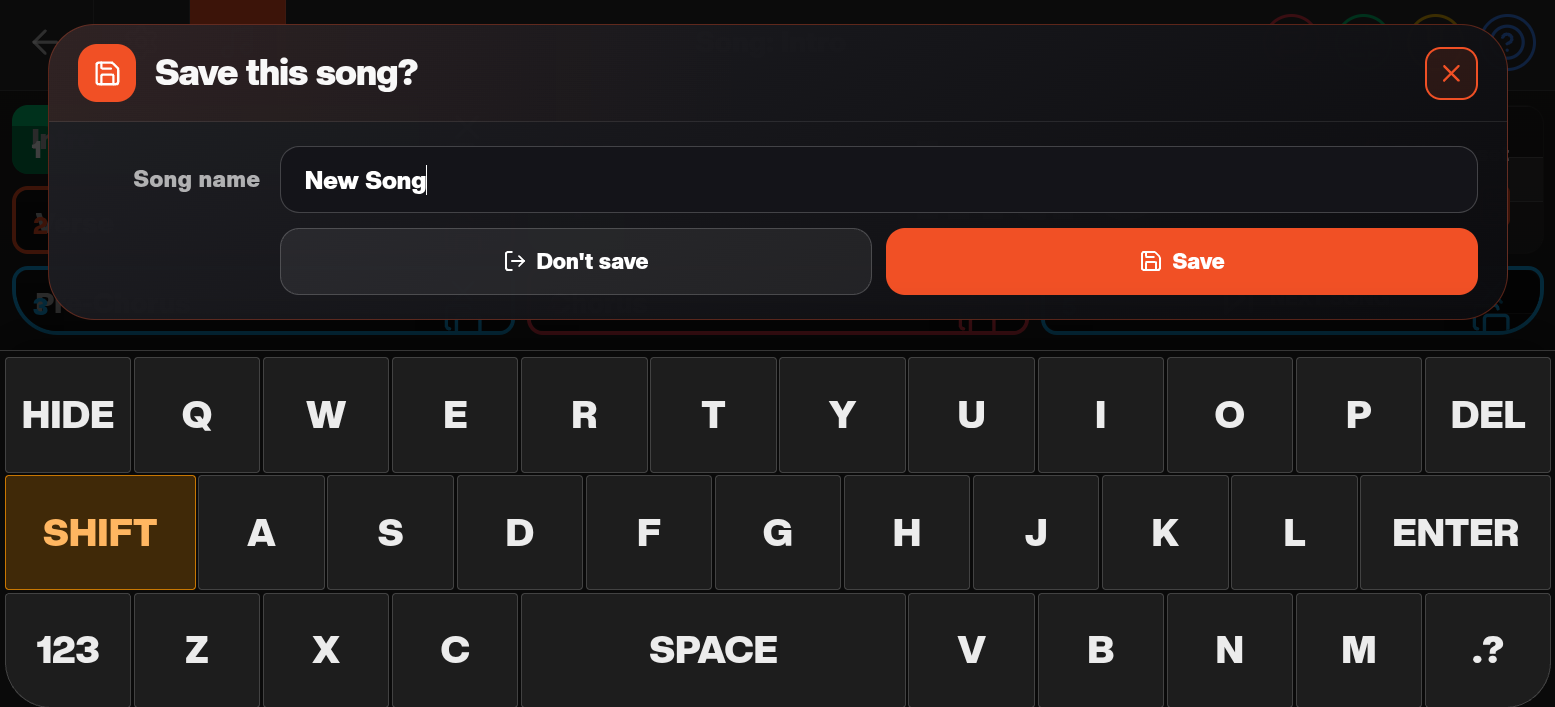 Save this song dialog with a Song name field and Save button
Adding presets to the page does not finish saving the song. Complete the save dialog before moving on. When editing an existing song, use Save Song to keep changes to its layout or name.
4. Check the saved song
Open the song again from Song Manager → Library. Check that its name and slot assignments are correct, then select each sound in turn and play through the transitions. If one sound is too loud or quiet, use Changing preset levels from a song.
Utility presets
Utility presets put performance actions into song slots. They use one of the same five slots as your sound presets, allowing you to reach an action from a footswitch.
- Tap Add Preset in an empty song slot.
- Tap the highlighted Preset word in the picker heading to switch to Select a Utility.
- Browse the cards or use Search utilities…, then select the action you want.
- Save the song to keep the assignment.
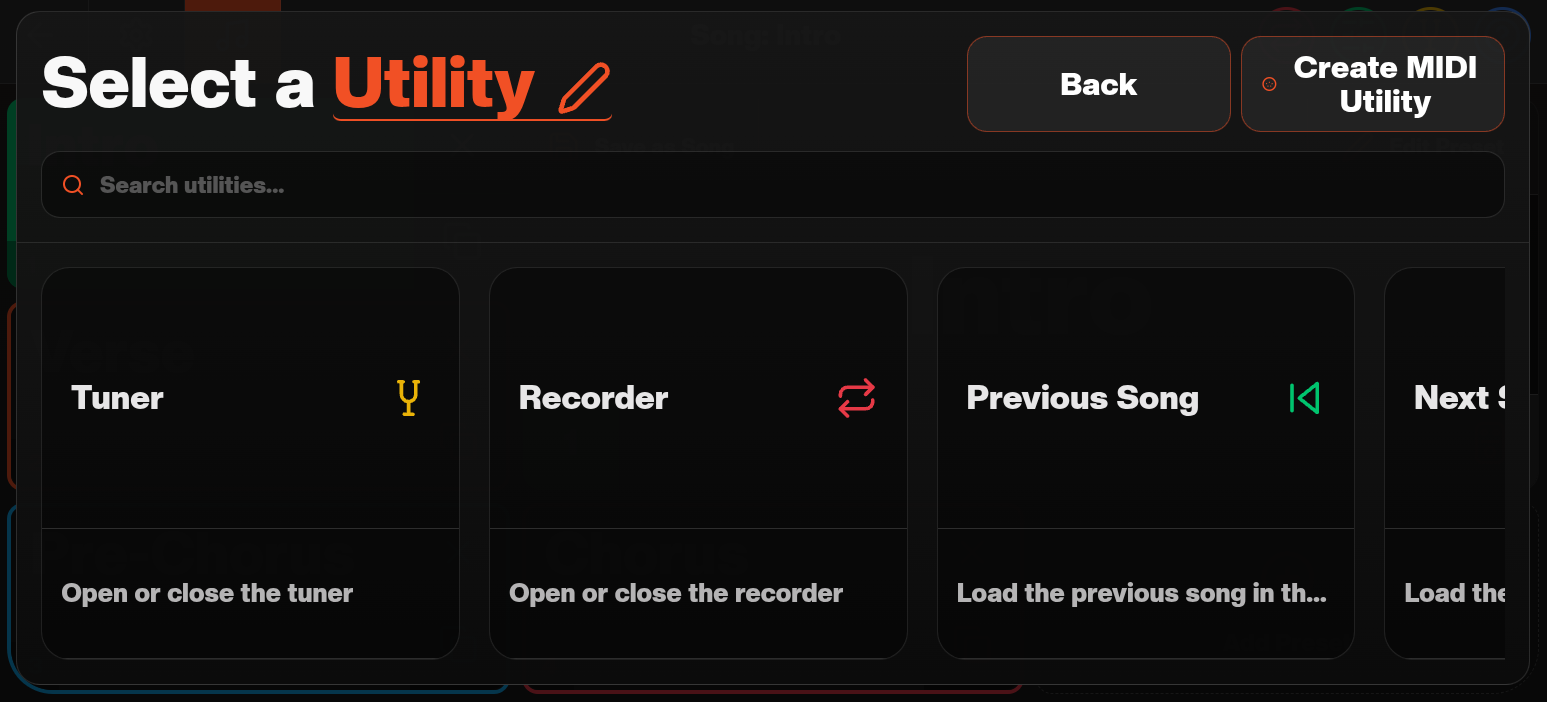
| Utility | Action |
|---|---|
| Tuner | Open or close the tuner. |
| Recorder | Open or close the recorder. |
| Previous Song | Load the previous song in the setlist. |
| Next Song | Load the next song in the setlist. |
| Global Mute | Toggle muting of Artemis's audio output. |
| MIDI utility | Send the MIDI messages configured for that utility. |
Use Previous Song and Next Song when performing songs in a setlist. The creation example reserves slot 5 for Next Song, so the first four footswitches select sounds and the fifth advances through the performance.
To make a MIDI utility, tap Create MIDI Utility at the top right of the picker. Give it a name, configure its MIDI messages, test them using the send-arrow controls, and save the utility. Add it to the desired song slot and save the song as well. See Controlling external MIDI pedals for message setup and connections.
Changing preset levels from a song
Use the mixer to balance the sounds in a song. Select the preset you want to adjust, then tap the green sliders icon in the Jam Page's top bar. Check the preset name at the top of the mixer before changing anything; the screenshot below is editing Intro.
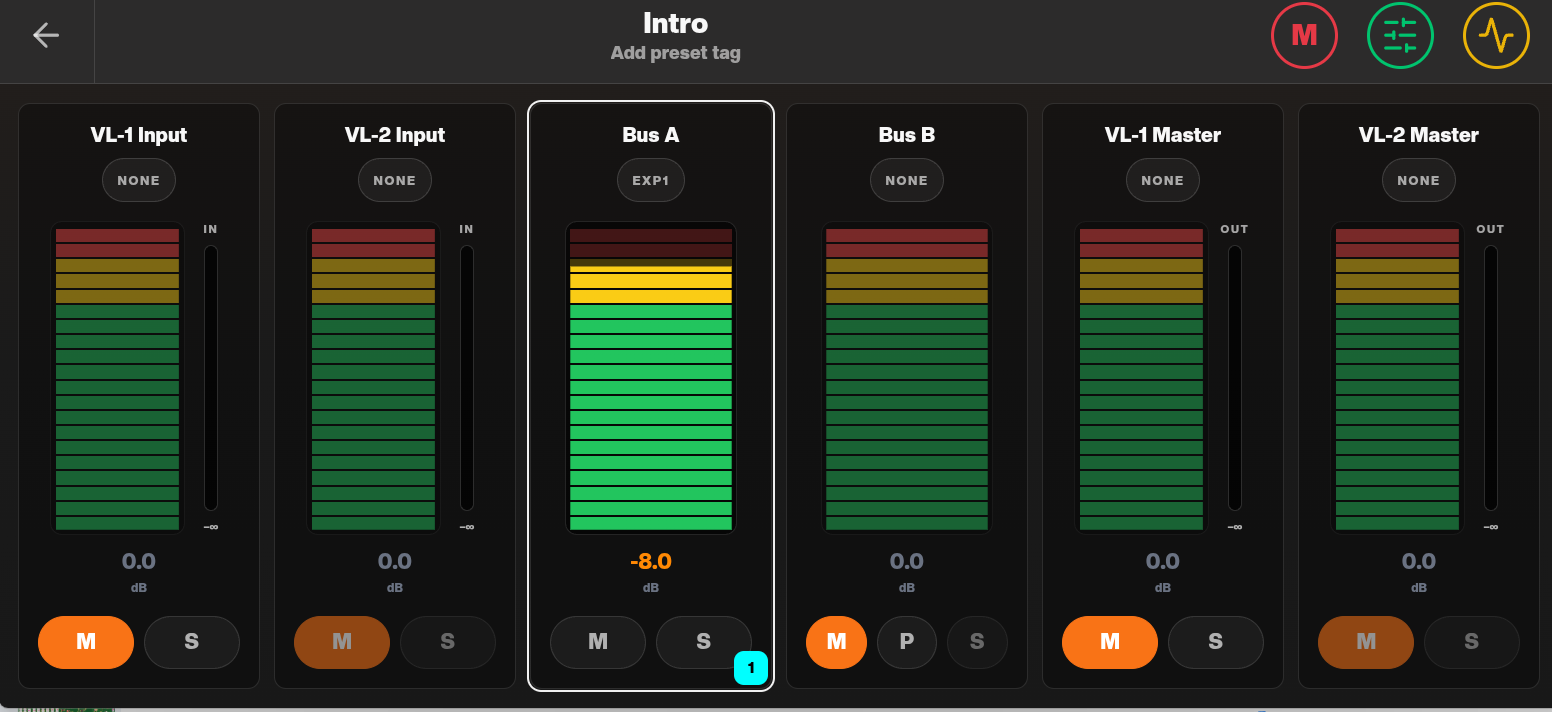
| Mixer strip | Level being adjusted |
|---|---|
| VL-1 Input / VL-2 Input | Input level for each virtual loop. |
| Bus A / Bus B | Level of each signal bus. |
| VL-1 Master / VL-2 Master | Master output level for each virtual loop. |
- Play through the selected preset and adjust the relevant level control while listening. The value beneath the control shows its setting in dB.
- Use the expression assignment control above a strip when you want an expression pedal to control that level. NONE indicates no assignment; the example shows EXP1 assigned to Bus A.
- When the mixer detects changed levels, it prompts you to save. Confirm the save to keep your edits, and use the back arrow to return to the song.
- Select another preset to compare its loudness, then return to the edited preset and check the result. Repeat for the other sounds as needed.
In the screenshot, Bus A is set to −8.0 dB. Choose levels that suit your pedals and the intended balance between sounds; this example value is not a target for every preset. Input and master controls affect different points in the virtual-loop signal path, so choose the control that matches the adjustment you intend to make.
These edits also change the shared library preset. Mixer levels and expression assignments are not independent song-only settings. Other songs using that preset will use the changed settings too; check them after making an adjustment. Saving the song layout and accepting the mixer's save prompt are separate parts of the workflow.
Stompbox Mode
Stompbox Mode gives you direct bypass control of the five reorderable loops. Use it when you want to switch individual pedals on and off or try a different pedal order.
From the Jam Page, tap the pedal icon at the lower right of the main display. The page changes to Stompbox Mode, and the five tiles show the pedal loops instead of the song's presets and utilities.
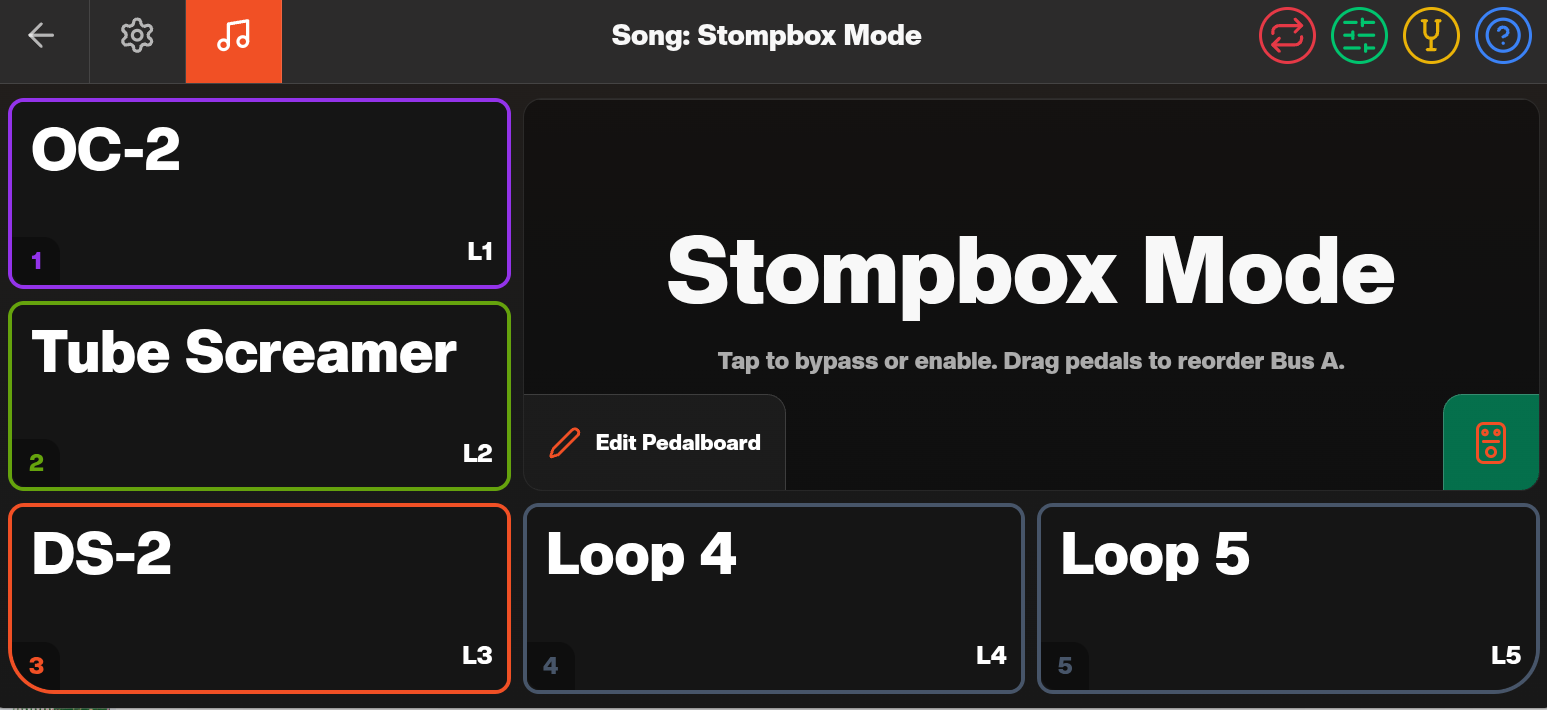 Stompbox Mode showing OC-2, Tube Screamer, DS-2, Loop 4 and Loop 5, with physical loop labels L1–L5
- Tap a pedal tile or press its corresponding footswitch to enable or bypass that loop. For example, use the Tube Screamer tile to switch the pedal connected to L2 in or out.
- Drag pedal tiles to change their order on Bus A, as described on the screen. The L1–L5 labels identify the physical loops, so you can still recognise each connection after reordering.
- Use Edit Pedalboard if you need to update the pedal names or physical-loop assignments in My Pedalboard.
- Tap the pedal icon again to return to the song view.
Stompbox bypass states and pedal order are independent of songs. They remain consistent as you move between songs; they are not saved as a separate stompbox layout for each song. Use presets when you want to recall a particular sound as part of a song.
The illustrated Stompbox Mode page controls L1–L5. The fixed stereo L6/L7 loop is not one of these five tiles.
Footswitches and LEDs
In the default Jam layout, a short press selects the corresponding song slot. Press the already active sound preset again to open the Invert Menu. A hold triggers the switch's configured hold action; the default hold threshold is 1 second. To enable or change a hold action, follow Enabling footswitch hold actions.
| Footswitch | Default hold action |
|---|---|
| 1 | Previous Song |
| 2 | Next Song |
| 3 | Toggle Tuner |
| 4 | Toggle Recorder |
| 5 | Exit |
Use Footswitch settings to review the normal, Invert Menu and hold assignments and adjust the hold duration. Check the displayed actions before a performance, especially on a device with existing settings.
Use LEDs to choose brightness, animations and colours. With All On, occupied song slots show their colours and the active sound preset is white, with animation when enabled. Active Only lights the active sound slot; active utilities can also remain indicated. Empty slots are unlit. The Invert Menu uses its menu colours, and the Home pop-up lights all five LEDs white. Other pages use their on-screen footswitch labels, so follow those labels when browsing or editing.
Creating and using a setlist
A setlist puts saved songs in performance order and chooses the starting preset for each song.
- Save the songs you want to use, then open Setlist Manager → Create.
- Enter a name, choose a tag or colour if wanted, and tap Create Setlist.
- Tap Add Songs. Choose the songs in the order you want them added, then confirm the selection.
- Use the handles beside the song rows to reorder them. You can drag a handle or tap a source and destination handle.
- Use the numbered preset buttons on each song row to choose its starting slot. Choose a sound preset that is ready for the beginning of that song.
- To remove a song from the setlist, tap its remove control and confirm with the second tap. This removes the setlist entry, not the saved song.
- Wait for Setlists saved. Setlist edits save automatically; if a save error appears, resolve it before leaving.
- Use the play control to start from the first song. On the Jam Page, use Next Song and Previous Song utilities or the Invert Menu to move through the setlist.
Return through Setlist Manager → Library to reopen the setlist. Rehearse the song order and starting presets once after editing.
Performance workflow
Before playing live, check the pedalboard wiring, match the levels of your song presets and test every song transition. Save preset changes and song slot changes, then reopen the setlist and start it from the beginning.
Preset recall can change relay routing, digital effects, levels, MIDI messages and amplifier control states. The transition depends on what changes between the two presets. Do not rely on delay or reverb tails carrying across a preset or block change without testing that exact transition. For sustained passages, try switching during a gap or keeping the required ambience in an external pedal whose route stays active.
Expression calibration and assignment
Calibrate an expression pedal
- Connect the pedal to EXP 1 or EXP 2, then open Expression / Control in the Home/settings carousel.
- Select the matching expression source and turn it on.
- Move the pedal through its full travel while watching In. Set Min and Max to the low and high values reached, keeping them different.
- Check that Out now covers the intended range from 0 to 127.
- Start with the Linear curve. Choose Slow Start, Fast Start or S-Curve if you want a different response.
- Adjust Smooth if the reading jitters. More smoothing makes movement steadier but less immediate.
These source settings apply across presets. The parameter controlled by the pedal is assigned separately in each preset. See Expression settings for a labelled screenshot of the calibration and response controls.
Assign a virtual effect control
For a simple example, use EXP 1 to vary the wet level of a pitch effect while keeping its dry level fixed.
- Open the preset, enter its virtual block and open the pitch effect's focus view.
- Select the Wet control to show its expression assignment panel.
- Choose EXP 1, then set Minimum to the dry-end wet level and Maximum to the strongest blend you want.
- Select Normal for increasing values as the expression input rises, or Inverted for the reverse direction.
- Play while moving the pedal and adjust the range to avoid unwanted level jumps.
- Leave the editor and save the preset when prompted.
The assignment works while that preset is active, including on the Jam Page. Recalling another preset loads that preset's assignments, so the same pedal can control a different parameter or nothing at all. The screenshot in Adding effects shows the expression panel beside a pitch effect.
Mixer strips also offer expression assignment. See Changing preset levels from a song; accept the mixer's save prompt to keep changed levels. Changes made through a song affect the shared library preset.
External control
Use preset MIDI messages to recall an external pedal's sound at the same time as an Artemis preset. Use a MIDI utility when a song slot should send a command without selecting another sound. The MIDI chapter explains both workflows.
For an amplifier with a compatible relay footswitch input, set CTRL 1/2 in the Preset Editor and save those states with the preset. Test the amplifier response at a low listening level before adding the preset to a setlist.